# How can I try IsDown?

Start your 14-day free trial with IsDown to explore our monitoring features and determine the best plan for your needs.

* **Sign Up for an Account**
  * Visit the [IsDown Sign-Up Page](https://isdown.app/users/sign_up).
  * Provide your business email and create a password.
  * No credit card is required.
* **Access Your Free Trial**
  * Upon signing up, you'll receive a 14-day free trial.
  * During the trial, you're limited to:
    * 15 monitors (third-party and custom)
    * 2 users
    * 2 dashboards and profiles
    * 2 status pages
* **Explore Features**
  * Use the trial period to explore IsDown's features and determine the best plan for your needs.

**If you require additional resources during your trial, please contact our** [**support team.**](https://isdown.app/help#)

***

**Related Articles**

* [**Create an Account**](https://help.isdown.app/accounts/create-an-account)
* [**Log In to an Account**](https://help.isdown.app/accounts/log-in-to-an-account)
* [**Reset Your Password**](https://help.isdown.app/accounts/reset-password)&#x20;


# Introduction to IsDown

Learn how to use IsDown to monitor external services, set up real-time alerts, and keep your team informed.

**IsDown** is your all-in-one **status page aggregator** and **outage monitoring tool**, designed to help you stay on top of your business-critical services.\
Get **real-time outage alerts** and a **centralized dashboard** to monitor the health of all your external services — all in one place.

To get started with IsDown, you first need an IsDown account.&#x20;

You can [Sign In](https://isdown.app/users/sign_in) or [Create your new account here](https://isdown.app/users/sign_up).

***

**Related Articles**

* [**How to Set Up Slack Alerts**](https://help.isdown.app/notifications/slack/notification-themes)
* [**Adding a New Team Member**](https://help.isdown.app/accounts/how-to-add-a-team-member)
* [**Start Monitoring a 3rd-party Service**](/cloud-monitoring/how-to-monitor-3rd-party-services)

***

**If you're experience issue**

* [**Notifications Not Sending**](https://help.isdown.app/notifications/email)
* [**SSO Login Issue**](/accounts/how-to-set-up-single-sign-on-sso/enforce-sso-login)
* [**Service Not Appearing in Search**](/cloud-monitoring/how-to-suggest-a-new-3rd-party-service)


# Create your Account

Learn how to create an IsDown account using your Google, Microsoft, or email credentials to start monitoring services and receiving alerts.

1. **Navigate to the Sign-Up Page**

   * Go to [isdown.app](https://isdown.app/) and click **Sign Up**.

   <figure><img src="/files/e9IwyRIH9v558lEXWa18" alt=""><figcaption></figcaption></figure>

2. **Choose a Sign-Up Method**
   * You can create an account using:
     * **Google Account**
     * **Microsoft Account**
     * **Email and Password**

3. **Follow the Prompts**
   * For **Google** or **Microsoft** accounts, you'll be redirected to authenticate.
   * For **Email**, enter your work email and a strong password.

4. **Access Your Dashboard**
   * After successful sign-up, you'll be redirected to the IsDown dashboard to begin setup.

> Use a strong password to secure your account.

#### **Next Steps**

* [How to Log in to Your Account](https://help.isdown.app/accounts/log-in-to-an-account)
* [Onboarding Steps](https://help.isdown.app/accounts/onboarding-steps)


# How to Log In to Your Account

Learn how to access your IsDown dashboard using your Google, Microsoft, or email credentials.

1. Go to [**isdown.app**](https://isdown.app/) and click **Sign In**
2. Choose Your Login Method

* **Google**
* **Microsoft**
* **Email and Password**

1. **Authenticate Your Account**
   * For **Google** or **Microsoft** accounts, you'll be redirected to authenticate.
   * For **Email**, enter your email and password, then click **Sign In**.
2. **Access Your Dashboard**
   * After successful login, you'll be redirected to your IsDown dashboard to start monitoring services.

**Forgot your password?** [Reset it here](https://help.isdown.app/accounts/reset-password).

***

**Related Articles**

* [**Create an Account**](https://help.isdown.app/accounts/create-an-account)
* [**Accept an Invitation**](https://help.isdown.app/accounts/accept-invitation)


# How to Reset Your Password

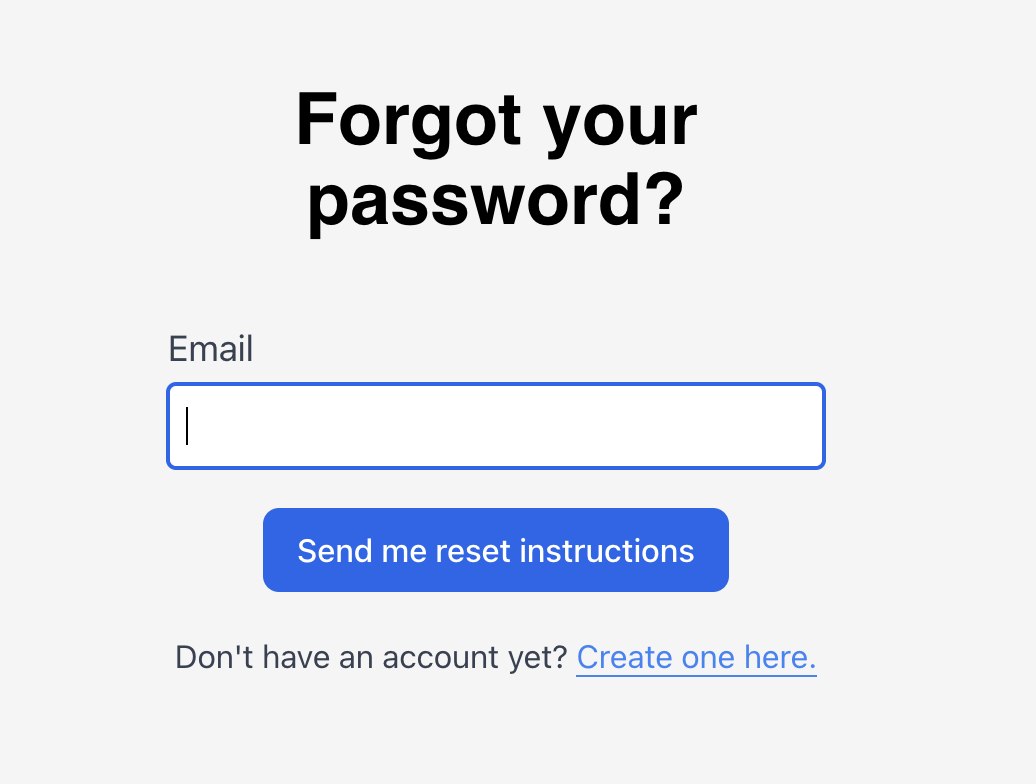
1. Go to the [**Reset Password**](https://isdown.app/users/password/new)  page

<figure><img src="/files/pYtVc1oaH0oKRTG91sRy" alt=""><figcaption></figcaption></figure>

2. Enter your IsDown account email address
3. Check your email inbox:
4. **Click on the link and set a new password**

> If you don't receive the email within a few minutes, check your spam or junk folder.

***

Related Articles

* [**Log in to an Account**](https://help.isdown.app/accounts/log-in-to-an-account)
* [**Create an Account**](https://help.isdown.app/accounts/create-an-account)
* [**Accept an Invitation**](https://help.isdown.app/accounts/accept-invitation)


# How to delete your Account

Learn how to **permanently** delete your IsDown account and remove all associated data.

1. **Sign in** to your IsDown account.
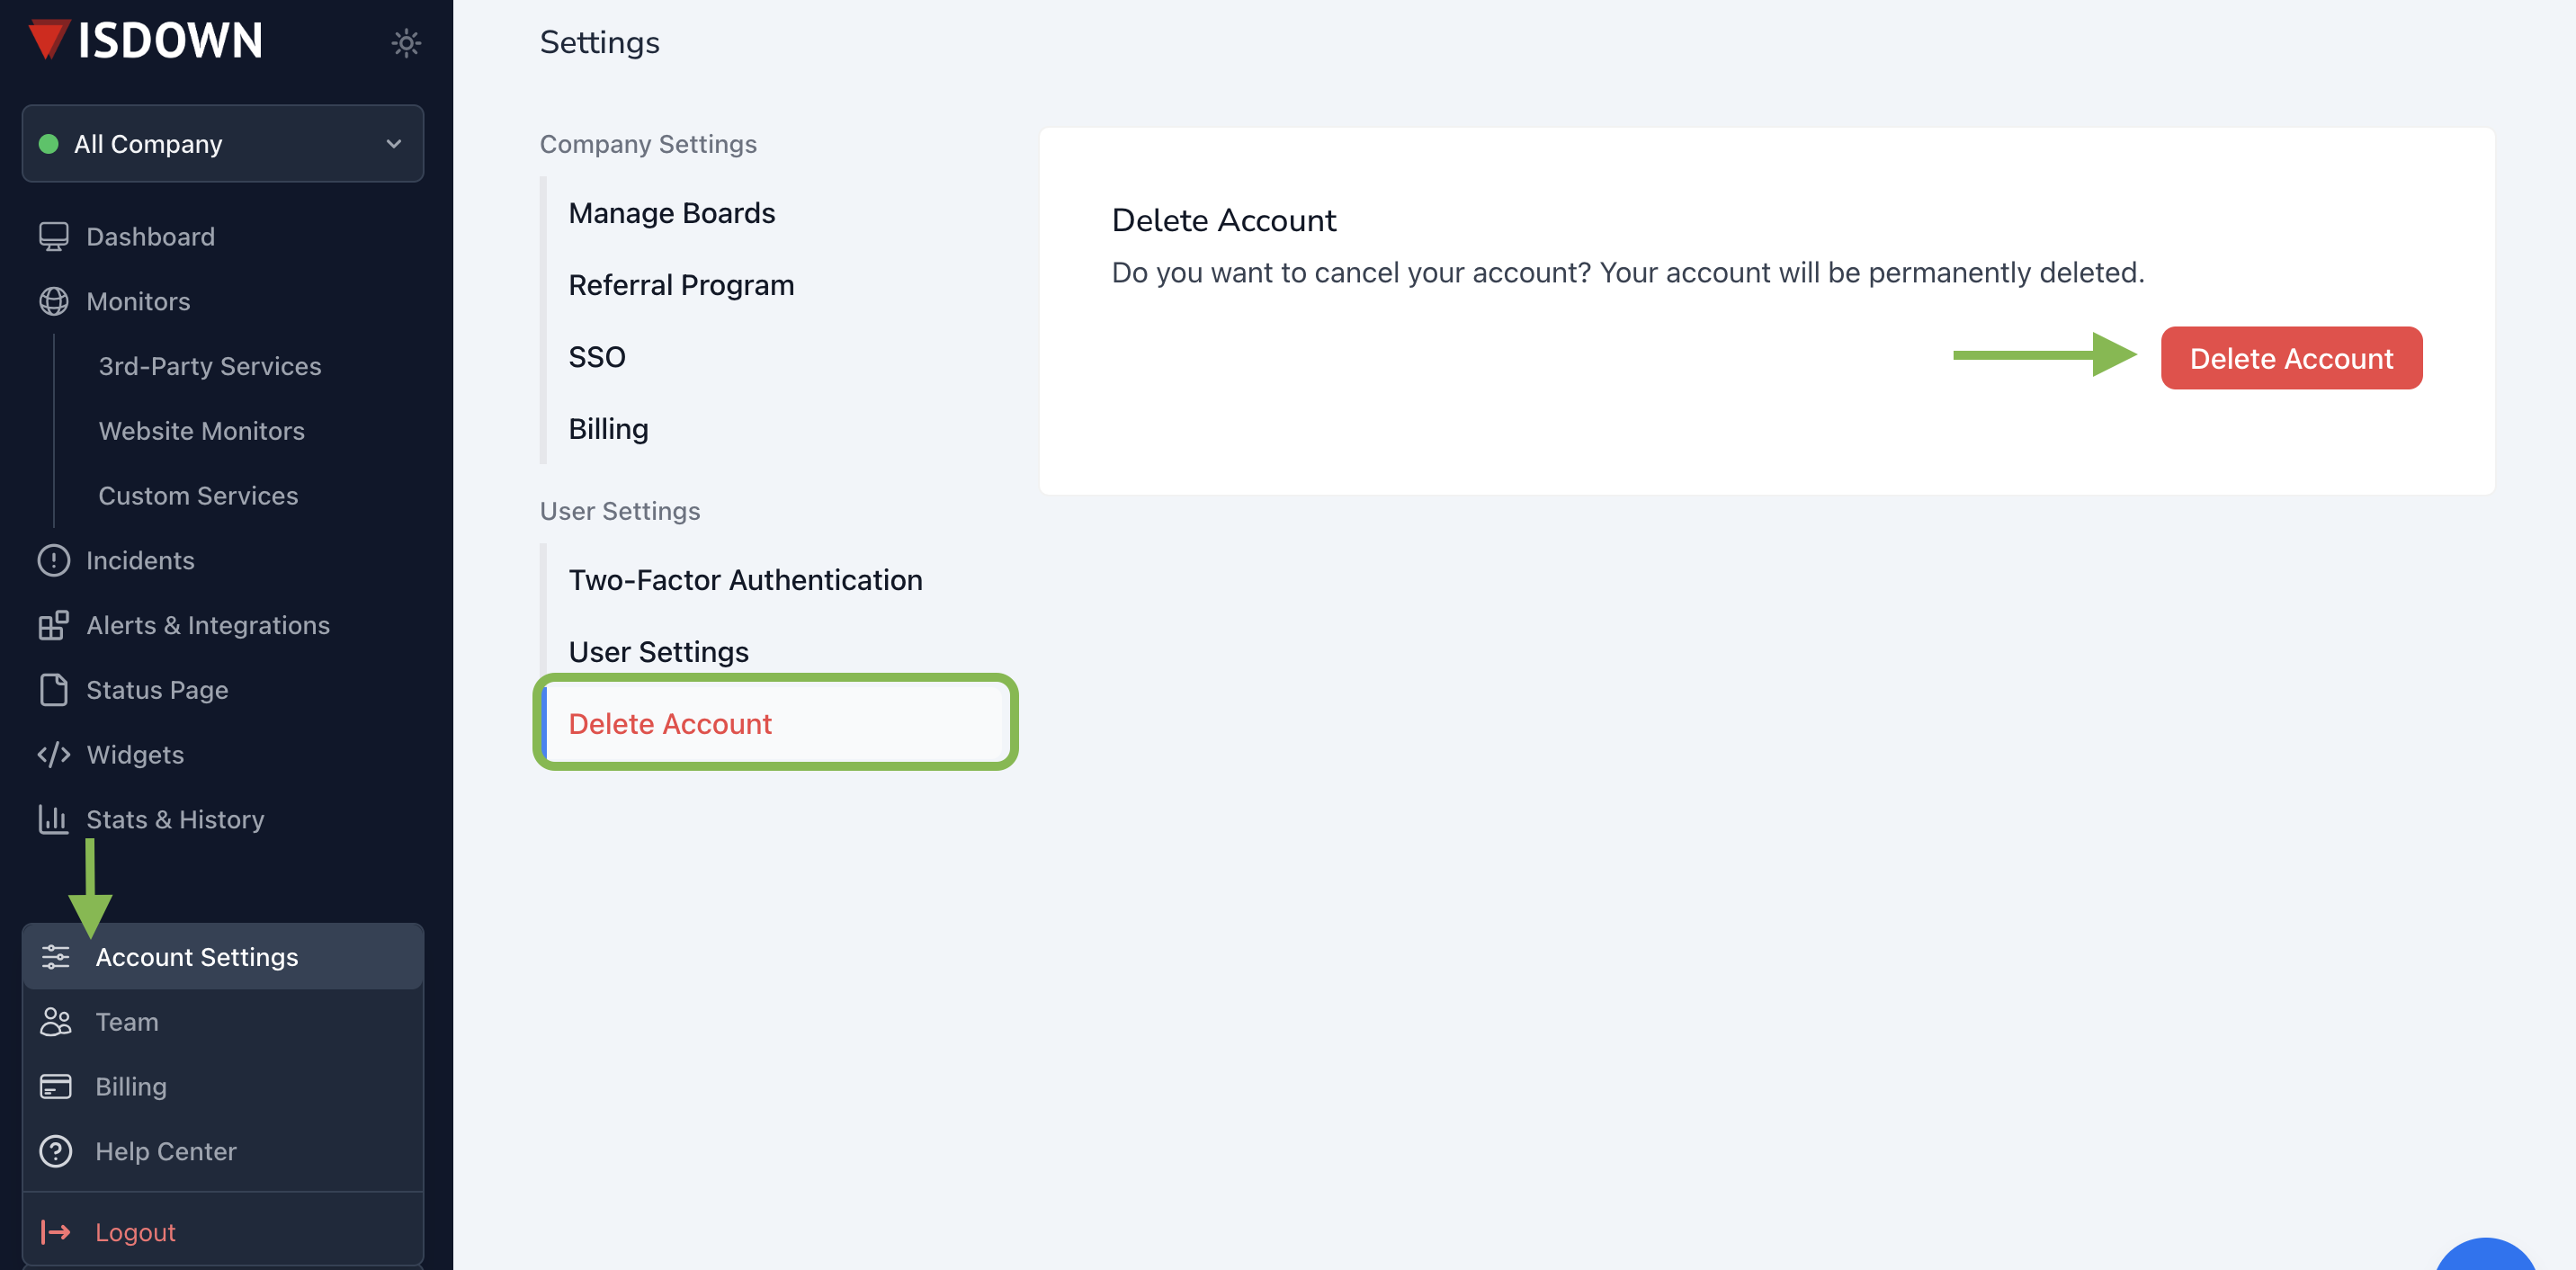
2. Go to [**Account Settings**](https://isdown.app/settings) (located in the sidebar).

<figure><img src="/files/tAEuzwH21yygmaewALZ0" alt="" width="563"><figcaption></figcaption></figure>

3. Scroll to the **Delete Account** section at the bottom of the page.
4. Click **Delete Account**, then confirm your action.

**Important:** Deleting your account is **permanent**. All your data, including history and preferences, will be erased and cannot be recovered.

***

Related Articles

* [**Reset Your Password**](https://help.isdown.app/accounts/reset-password)
* [**Create a New Account**](https://help.isdown.app/accounts/create-an-account)​


# How to Get Started with IsDown

Set up IsDown in just a few minutes. Follow these steps to start monitoring your services and receiving real-time alerts.

1. &#x20;**Add Services to Your Dashboard**

* Select the [services](/cloud-monitoring/how-to-monitor-3rd-party-services) you want to monitor.&#x20;

<figure><img src="/files/a7S6kufpMCVJYUyWo0X1" alt="" width="563"><figcaption></figcaption></figure>

2. **Set Up Notifications**

* By default, you’ll receive outage alerts via **email**.
* Customize notifications in the [**Alerts & Integrations**](https://isdown.app/p/notifications) section to receive alerts via **Slack, Microsoft Teams, PagerDuty, Datadog**, and more.

<figure><img src="/files/35JCBUZXvmpCydn2hCiy" alt="" width="563"><figcaption></figcaption></figure>

3. **Customize Alerts**

* Tailor notifications by:

  **Components** – Get alerts only for specific service components.

  **Severity** – Choose to receive only **major outage** alerts.

<figure><img src="/files/0AxdYyXo1xLPUm6vuVjO" alt="" width="563"><figcaption></figcaption></figure>

4. **Create a Status Page**

* Want to share the dashboard with your team or clients?
* Go to the **Status Page** section in the sidebar and follow the setup steps.

<figure><img src="/files/s4gMr5qkqdDfK33YK1eV" alt="" width="563"><figcaption></figcaption></figure>

***

**Related Articles**

* [**How to Add a Team Member**](https://help.isdown.app/accounts/how-to-add-a-team-member)
* [**Start Monitoring a 3rd-Party Service**](https://help.isdown.app/cloud-monitoring/start-monitoring-a-3rd-party-service)
* [**Enable Subscribers on Your Status Page**](https://help.isdown.app/status-page/enable-subscribers)​


# How to add a team member

Invite team members to your IsDown account to collaborate on monitoring and managing services. Here are the following steps:

1. Go to the **"Team" section** in the sidebar.

<figure><img src="/files/OuH3uJmP7Vv2mfkNl2P8" alt=""><figcaption></figcaption></figure>

2. Click **"Invite Members"** and enter the team member's name, email, and role.

<figure><img src="/files/wRxqhWfgFA4ByRHvOtFz" alt=""><figcaption></figcaption></figure>

3. Choose a **role** for the new member:

* **Owner** – Full access to all settings.
* **Write & Read** – Can manage everything **except** Billing, Account Members, and Account Settings.
* **Read Only** – Can view the dashboard and service statuses **but cannot make changes**.

4. Click **"Invite"**, and your team member will receive an email invitation to join IsDown.

<figure><img src="/files/5bQhwVd49RUHq7ZXpS2j" alt="" width="563"><figcaption></figcaption></figure>

***

**Related Articles**

* [**How to Remove a Team Member**](https://help.isdown.app/accounts/how-to-remove-a-team-member)
* [**Accept an Invitation**](https://help.isdown.app/accounts/accept-invitation)
* [**Setup Admin SSO**](https://help.isdown.app/accounts/setup-admin-sso)


# How to remove a team member

Learn how to remove a team member from your IsDown account to manage access and maintain security:

1. **Go to the "Team" section** in the sidebar.<br>

   <figure><img src="/files/sDrUvMTi7lOwD3YUuGrN" alt=""><figcaption></figcaption></figure>
2. Find the member you want to remove.
3. Click the **"Remove"** button next to their name.<br>

   <figure><img src="/files/5Xho4SS3S42aNv6BVDxQ" alt=""><figcaption></figcaption></figure>
4. Confirm the action if prompted.

**Note:** Once removed, the team member will lose access to the account immediately.

***

**Related Articles**

* [**How to Add a Team Member**](https://help.isdown.app/accounts/how-to-add-a-team-member)
* [**Accept an Invitation**](https://help.isdown.app/accounts/accept-invitation)
* [**Setup Admin SSO**](https://help.isdown.app/accounts/setup-admin-sso)​


# How to Set Up Single Sign-On (SSO)

Enable Single Sign-On (SSO) to allow your team to securely access IsDown using your organization's identity provider (IdP). This guide will walk you through the setup process.

{% hint style="info" %}
SSO is available only on **Business** and **Enterprise** plans.
{% endhint %}

Start by creating a SAML 2.0 application in your IdP. Choose from our step-by-step guides:

* [Okta – Full Guide](https://help.isdown.app/accounts/setup-admin-sso/okta)
* [Azure AD – Full Guide](https://help.isdown.app/accounts/setup-admin-sso/azure-ad)
* [Google SSO – Full Guide](https://help.isdown.app/accounts/setup-admin-sso/google-sso)

Using a different provider? Contact our [support team.](https://isdown.app/help)

Once your SSO app is created, follow these steps:

1. **Log in** to your IsDown account.
2. Go to **Account Settings** in the sidebar.<br>

   <figure><img src="/files/Prr53Q7yCpDM4PiTsPRm" alt=""><figcaption></figcaption></figure>
3. Scroll to the **SSO** section and click **Set up**.

<figure><img src="/files/9aFIeObmnTlaY3Mmmzd3" alt=""><figcaption></figcaption></figure>

4. Fill in the required fields:

* **Domain**: The domain your users will log in with (e.g., for `nuno@yourcompany.com`, enter `yourcompany.com`).
* **Identity Provider**: Copy the value of the Reply URL / SSO URL\
  *Example URL:* `https://isdown.app/users/auth/saml/{UUID}/callback`
* **Issuer / Entity ID**: Usually `isdown` if you followed our default setup.
* **IDP Certificate**: Paste the entire certificate text (including `BEGIN CERTIFICATE` and `END CERTIFICATE`). Or, extract the value of `X509Certificate` from your metadata XML file.
* **IDP Sign-In URL**: Find the `Location` value in the `SingleSignOnService` tag in your metadata XML.

<figure><img src="/files/DllXH5OC4rdp4iNh0wpJ" alt=""><figcaption></figcaption></figure>

5. Click **Save** to apply your settings.
6. For quick login, you can use `https://isdown.app/sso?domain=YOURDOMAIN`

#### Need Help?

Reach out via the in-app chat or email us at <support@isdown.app>.\
Here’s [our logo](https://help.isdown.app/~gitbook/image?url=https%3A%2F%2F3217946727-files.gitbook.io%2F%7E%2Ffiles%2Fv0%2Fb%2Fgitbook-x-prod.appspot.com%2Fo%2Fspaces%252FwE1RBRUaBkIz2ukzWl7o%252Fuploads%252FWniWaKVI37Tcvl4hvWAV%252Ficon512.png%3Falt%3Dmedia%26token%3D7dfae9fd-fd49-4819-9251-09654ebdab75\&width=300\&dpr=4\&quality=100\&sign=df89cf63\&sv=2) to upload in your SSO app settings, if needed.

***

#### **Related Articles**

* [**How to Add a Team Member**](https://help.isdown.app/accounts/how-to-add-a-team-member)
* [**How to Remove a Team Member**](https://help.isdown.app/accounts/how-to-remove-a-team-member)
* [**Accept an Invitation**](https://help.isdown.app/accounts/accept-invitation)


# Okta

Instructions to set up Okta SAML Integration

* **Single Sign On URL** -> <https://isdown.app/users/auth/saml/{UUID}/callback>
* **Audience URI (SP Entity ID)** -> *isdown* or something else you prefer;
* **Default RelayState** -> Leave blank;
* **Name ID format** -> EmailAddress;
* Application Username -> Okta username;
* Attribute Statements:
  * email -> Unspecified -> user.email
  * first\_name -> Unspecified -> user.firstName
  * last\_name -> Unspecified -> user.lastName

Once completed, either:

* Proceed to the [How to Set Up Single Sign-On (SSO)](https://help.isdown.app/accounts/how-to-set-up-single-sign-on-sso) section to complete the configuration manually.
* Or, if you prefer, contact us via **chat support** and share the **Metadata URL**, which you can find in the **Sign On** tab in Okta.

**Related Articles**

* [**How to Set Up SSO with Azure AD**](https://help.isdown.app/accounts/setup-sso/azure-ad)
* [**How to Set Up SSO with Google**](https://help.isdown.app/accounts/setup-sso/google-sso)
* [**Enforce SSO Login for All User**](https://help.isdown.app/accounts/setup-sso/enforce-sso-login)


# Azure AD

Instructions for setting up SSO in Azure AD

Instructions to setup Azure AD SAML Integration

* Choose SAML as the sign-on method

<figure><img src="/files/4t1Y5S2yueWoRUnVSLcC" alt=""><figcaption></figcaption></figure>

* **Identifier (Entity ID)** -> isdown
* **Reply URL (Assertion Consumer Service URL) ->**&#x20;

  <https://isdown.app/users/auth/saml/{UUID}/callback>
* **Sign on URL** -> <https://isdown.app/sso>
* Should not need to change Attributes & Claims

<figure><img src="/files/ntkkHaMFB5bVNVNWoqct" alt=""><figcaption></figcaption></figure>

When finished, please go to [How to Set Up Single Sign-On (SSO)](/accounts/how-to-set-up-single-sign-on-sso) for instructions on how to set it up yourself. If you prefer, you can send us a chat support with the **Metadata URL.**

#### **Related Articles**

* [**How to Set Up SSO with Okta**](https://help.isdown.app/accounts/setup-sso/okta)
* [**How to Set Up SSO with Google**](https://help.isdown.app/accounts/setup-sso/google-sso)
* [**Enforce SSO Login for All Users**](https://help.isdown.app/accounts/setup-sso/enforce-sso-login)


# Google SSO

Instructions for setting up SSO in Google

Instructions to set up Google SAML Integration

* **Identifier (Entity ID)** -> isdown
* **Reply URL (Assertion Consumer Service URL) ->**&#x20;

  <https://isdown.app/users/auth/saml/{UUID}/callback>
* **Sign on URL** -> <https://isdown.app/sso>

When finished, please go to [How to Set Up Single Sign-On (SSO)](/accounts/how-to-set-up-single-sign-on-sso) for instructions on how to set it up yourself. If you prefer, you can send us a chat support with the **Metadata URL.**

#### **Related Articles**

* [**How to Set Up SSO with Okta**](https://help.isdown.app/accounts/setup-sso/okta)
* [**How to Set Up SSO with Azure AD**](https://help.isdown.app/accounts/setup-sso/azure-ad)
* [**Enforce SSO Login for All Users**](https://help.isdown.app/accounts/setup-sso/enforce-sso-login)


# Enforce SSO Login

To require all team members to log in via **SSO**, follow these steps carefully:

1. Go to your [**SSO Settings** ](https://isdown.app/settings#sso)page.
2. Check the box **“Require SSO login for all users.”**
3. Before enabling:
   * Double-check that **all SSO attributes** (email, first name, last name) are correctly set up.
   * **Test the login** yourself to ensure it’s working as expected.

**Important:**

Locked out of your account? **Contact us** via chat or email at **<support@isdown.app>** and we'll help you get back in.

**Related Articles**

* [**How to Set Up Admin SSO**](https://help.isdown.app/accounts/setup-admin-sso)
* [**How to Set Up SSO with Okta**](https://help.isdown.app/accounts/setup-admin-sso/okta)
* [**How to Set Up SSO with Google Workspace**](https://help.isdown.app/accounts/how-to-set-up-single-sign-on-sso/google-sso)


# How to setup Two-Factor Authentication (2FA)

Two-factor authentication (2FA) adds an extra layer of security to your account. In addition to your password, you will need a 6-digit code generated by a mobile app to log in.

### Prerequisites

Before you begin, download and install an authenticator app on your mobile device, for example:

* **Google Authenticator**
* **Authy**
* **Microsoft Authenticator**
* **1Password**

### Setup

1. Log in to your **isDown** account.
2. Click on **Settings** in the left-hand sidebar.

<figure><img src="/files/EdlH06n2ySujpwiNSHRc" alt=""><figcaption></figcaption></figure>

3. Under the **User Settings** section, select **Two-Factor Authentication**.
4. Click the blue **Set up two-factor authentication** button.

<figure><img src="/files/aSl7cN0qu5yJu29JnrFg" alt=""><figcaption></figcaption></figure>

5. A modal will appear on your screen showing a **QR Code**.

<figure><img src="/files/Pwol0CSM6YsliIQDP63Z" alt="" width="531"><figcaption></figcaption></figure>

6. Open your authenticator app on your mobile device.
7. Tap the **+** (plus) icon or the **Add a code** button.

<figure><img src="/files/Dxg6fBnZWLMotDlWZoLH" alt="" width="563"><figcaption></figcaption></figure>

8. Select **Scan a QR code**.

* *Note: If prompted, allow the app permission to access your mobile camera.*

9. Point your phone’s camera at the QR code displayed on your computer screen.
10. Once scanned, your mobile app will display a frequently changing **6-digit code**.
11. Enter this 6-digit code into the **"Enter Verification Code"** field on the isDown setup screen. (Step 2)
12. Click **Verify and Enable 2FA**.
13. Once 2FA is enabled, you will be presented with 12 single-use recovery codes.
    * Download or copy these codes immediately.
    * Store them in a secure place (like a password manager).
    * If you lose access to your phone, these codes are the only way to log in.

{% hint style="info" %}
Once enabled, you will be required to provide a code from your mobile app every time you log in.&#x20;

Ensure you do not delete the account from your authenticator app, as this could result in you being locked out of your isDown account.
{% endhint %}

If you have any questions or need help, please get in touch with us via in-app chat or email us at **<support@isdown.app>**.


# Troubleshoot 2FA

If you encounter issues while setting up or using Two-Factor Authentication, please refer to the solutions below.

#### **Invalid Verification Code**

If the 6-digit code is being rejected, it is usually due to a time-sync error between your device and the server.

* **Check your Time Settings:** Ensure your mobile device's date and time are set to **Set Automatically**.
* **Sync your App (Android only):** In Google Authenticator, go to **Settings** > **Time correction for codes** > **Sync now**.
* **Be Fast:** The codes expire every 30 seconds. Ensure you are entering the most recent code displayed.

#### QR Code Won't Scan

* **Brightness:** Increase the brightness on your computer screen.
* **Permissions:** Ensure you have granted the authenticator app permission to use your mobile camera.
* **Distance:** Hold your phone about 20–30 cm (8–12 inches) away from the screen and let the camera focus.

#### Lost Access to your Account

If you can no longer access your authenticator app (for example, if you lost your phone or switched devices) and cannot log in, use one of the following methods:

**1. Use Recovery Codes**

During the 2FA setup, you were provided with **12 single-use recovery codes**.

* Enter one of these codes in the 2FA verification field to log in.
* Once logged in, you can disable 2FA or set it up on a new device.

**2. Contact Support**

If you have lost your recovery codes and cannot log in, please email us at **<support@isdown.app>.**

***

### Team Administrators

You can monitor the security status of your organization from the Team page.

* **View 2FA Status:** The 2FA column shows which team members have enabled the feature.
* **Limitations:** Note that for security reasons, clicking **Edit** on a team member only allows you to change their Name or Email. **You cannot disable or reset 2FA for another user.**&#x20;


# How to Accept Invitation

You've been invited to join your organization's IsDown account. Follow these steps to accept the invitation and get started.

**Step 1: Check Your Inbox**

You should’ve received an invitation email from **IsDown**.

> Can’t find it? Check your spam or promotions folders just in case.

It looks something like this:&#x20;

<figure><img src="/files/rMPD02wGlDyD0DPv2ZVk" alt=""><figcaption></figcaption></figure>

**Step 2: Click the Invitation Link**

Click the **“Accept Invitation”** button in the email. You’ll be redirected to IsDown.

<figure><img src="/files/rwhme8EBFcFm0tJI3FiN" alt="" width="563"><figcaption></figcaption></figure>

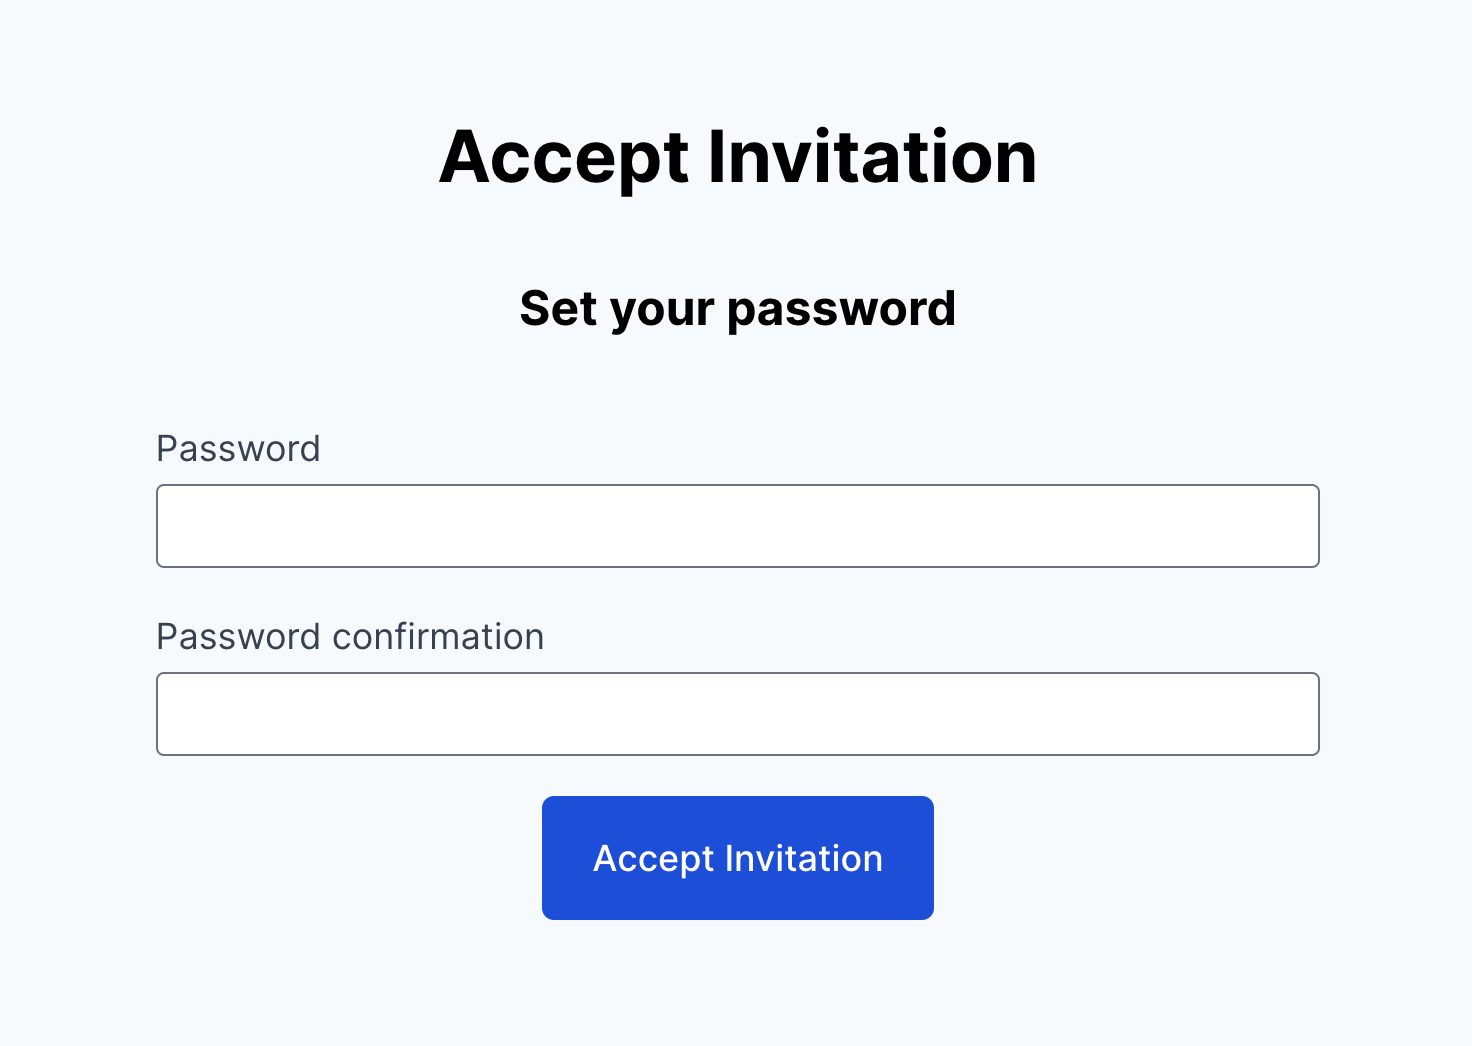
**Step 3: Set Your Password & Join the Team**

Fill in the input fields with a **strong password**, with at least 12 characters, to secure your IsDown account. We recommend using a password manager like **1Password** to generate and store it safely.&#x20;

After setting your password, click **"Accept Invitation"** to complete the process.

If everything goes well, you’ll be automatically redirected to your **IsDown dashboard.**

Need help? Contact us via chat or email at [**support@isdown.app**](mailto:support@isdown.app)

***

**Related Articles**

* [How to Add a Team Member](https://help.isdown.app/accounts/how-to-add-a-team-member)
* [How to Remove a Team Member](https://help.isdown.app/accounts/how-to-remove-a-team-member)
* [How to Get Started with IsDown​](https://help.isdown.app/accounts/how-to-get-started-with-isdown)


# How to Monitor 3rd-party services

Set up monitoring for external services with IsDown to get notified whenever they experience outages or disruptions.

### *Here's a quick tutorial video to help you set everything up easily:*

{% embed url="<https://share.zight.com/p9uy4Ljw>" %}

### Steps to add a Service

1. **Sign In** or **Sign Up** to your IsDown account.
2. Navigate to the **Profile** where you want to add the monitor.
3. Click on **“3rd-Party Services”** in the sidebar.

<figure><img src="/files/VErcm7pdodz4uOhc0MRG" alt=""><figcaption></figcaption></figure>

4. Browse popular services on the **"Add Service"** link or use the **search bar** to find the one you need.
5. When you find the service, click on the **“Add”** button to start monitoring.

<figure><img src="/files/RttH52UFgQ2lXZfSXh8t" alt=""><figcaption></figcaption></figure>

Can’t Find a Service? No problem — we’ve got you covered.

Just open the **in-app chat** (bottom right corner) or email us at **<support@isdown.app>** and we’ll do our best to add it for you.

***

**Related Articles**

* [**How to Set Up Slack Notifications**](https://help.isdown.app/notifications/slack)
* [**How to filter notifications**](/cloud-monitoring/how-to-filter-notification-by-outage-severity)
* [**How to Add a Team Member**](https://help.isdown.app/accounts/how-to-add-a-team-member)


# How to Stop Monitoring a 3rd-party service

If you no longer need to monitor a specific external service, follow these steps to remove it from your IsDown dashboard.

1. **Log in** to your IsDown account.
2. Navigate to the **Monitors** section in the left sidebar.
3. Select **3rd-Party Services** and locate the service you wish to stop monitoring.
4. Click on the **Settings** icon next to the service name.

<figure><img src="/files/GERPlpDqqB47gJ1vbdEH" alt=""><figcaption></figcaption></figure>

5. Select **Remove from Dashboard.**

<figure><img src="/files/S1nEVT9YPCZg9HN6sZTx" alt=""><figcaption></figcaption></figure>

6. Confirm the removal when prompted.

That’s it! You’ll stop receiving notifications for that service.

> You can always re-add it later by following the steps in [Start Monitoring a 3rd-Party Service.](/cloud-monitoring/how-to-monitor-3rd-party-services)

***

**Related Articles**

* [How to Start Monitoring an External Service](https://help.isdown.app/cloud-monitoring/start-monitoring-a-3rd-party-service)
* [How to Add a Custom Monitor](https://help.isdown.app/custom-monitors/how-to-add-a-custom-monitor)
* [How to Remove a Custom Monitor](https://help.isdown.app/custom-monitors/how-to-remove-a-custom-monitor)


# How to suggest a new 3rd-party service

1. **Sign in** to your IsDown account.
2. Select "**Monitors"** section.
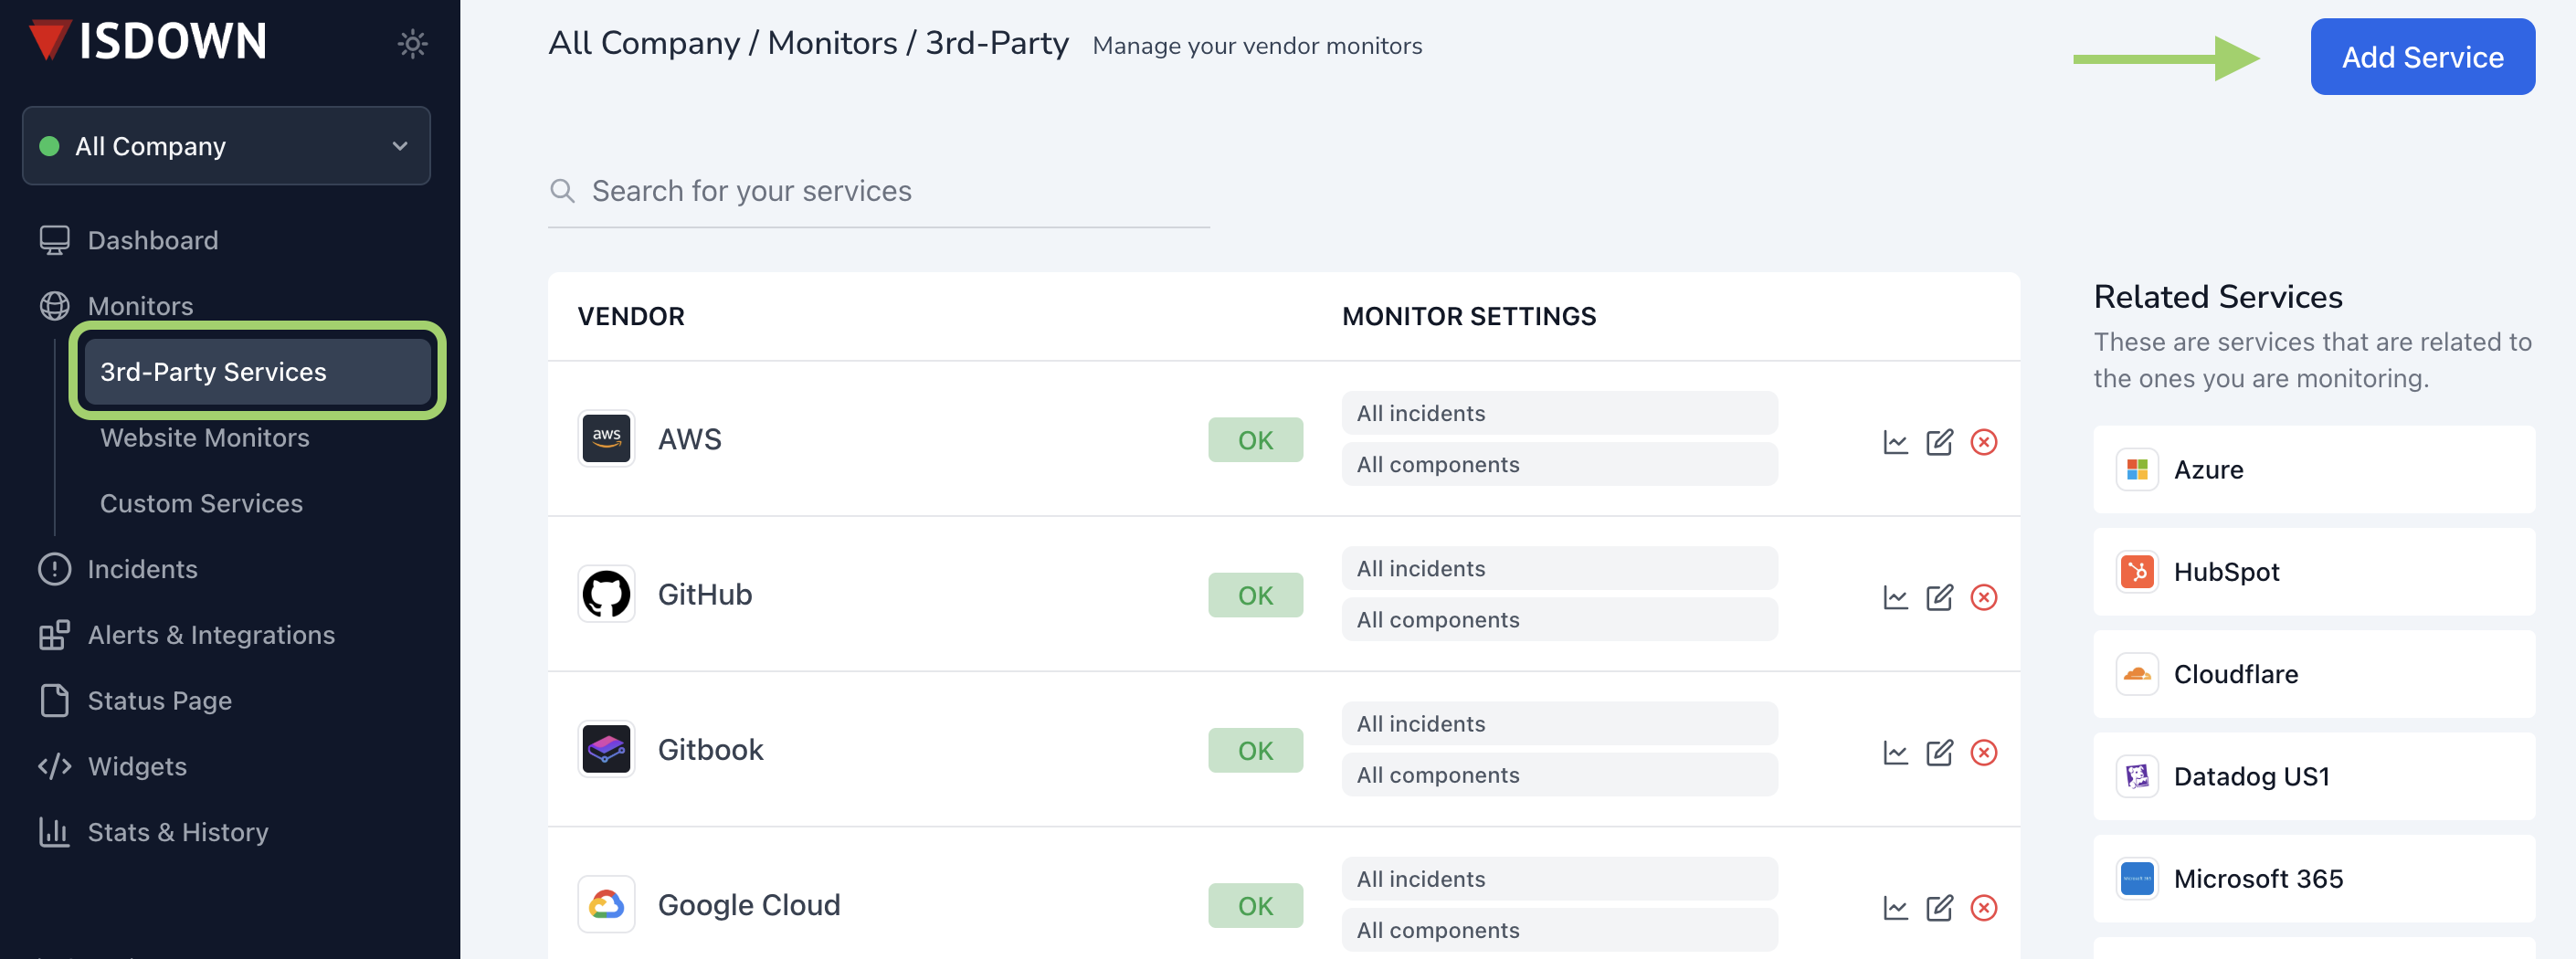
3. In the upper-right corner, click on "**Add Service".**

<figure><img src="/files/uCGKk4fkXARsS6mvrQPS" alt=""><figcaption></figcaption></figure>

4. Finally, click on "**Request a Service**" to open a pop-up where you can enter and submit the name of the service you'd like us to add.

<figure><img src="/files/4JiV61W3LPls4d9GUxqF" alt=""><figcaption></figcaption></figure>

<figure><img src="/files/Qw7ooH7pu58tcCYI9Qoe" alt=""><figcaption></figcaption></figure>

> You can also email us at <support@isdown.app> with the name of the service you'd like to suggest.

***

**Related Articles**

* [**How to Start Monitoring an External Service**](https://help.isdown.app/cloud-monitoring/start-monitoring-a-3rd-party-service)
* [**How to Stop Monitoring an External Service**](https://help.isdown.app/cloud-monitoring/stop-monitoring-a-3rd-party-service)
* [**How to Add a Website Monitor**](https://help.isdown.app/custom-monitors/how-to-add-a-custom-monitor)


# How to Filter Notification by Outage Severity

1. **Sign in** to your IsDown account.
2. Navigate to your **Dashboard**.
3. In the "**3rd Party Monitors"** section, locate and click on the service you wish to adjust.
4. Click on "**Monitor Settings"**

<figure><img src="/files/f7lSCxfHs1ssRhme6ywD" alt=""><figcaption></figcaption></figure>

5. Select "**Severity Filtering**" and choose your preferred notification level:
   * **All Incidents**: Receive notifications for all outages (Minor and Major).
   * **Only Major Incidents**: Receive notifications only for major outages.
   * **No Notifications**:  Only shows the service in the dashboard and doesn't send notifications.

<figure><img src="/files/i6mFTB9kFDrYrQSuuGdC" alt=""><figcaption></figcaption></figure>

6. Click **Save** to apply your changes.​

***

**Re**l**ated Articles**

* [**What Are the Severities for Outages/Services**](https://help.isdown.app/cloud-monitoring/what-are-the-severities-for-outages-services)
* [**How to Filter Outages Affecting Specific Components**](https://help.isdown.app/cloud-monitoring/how-to-filter-outages-affecting-some-specific-component-s)


# How to Filter Outages by Specific Components

Customize your notifications to receive alerts only for outages affecting specific components of a service.

1. **Sign in** to your IsDown account.
2. Select "**Monitors**" and then go to the "**3rd Party Services"** section.
3. Locate the service you're monitoring and click on the **Settings** icon.

<figure><img src="/files/82GXEw6gfiStBucbKtx7" alt=""><figcaption></figcaption></figure>

4. Select **Monitor Settings**.

<figure><img src="/files/k4brlJ1dJQOdeuAfjRaq" alt=""><figcaption><p>Image 2 </p></figcaption></figure>

If you need assistant, please reach out via chat or email us at [**support@isdown.app**](mailto:support@isdown.app).

5. In the sidebar, click **Component Monitoring** and select the components you want to monitor.

   <figure><img src="/files/YSzLc4BqI2XXwdsjoqwP" alt=""><figcaption></figcaption></figure>
6. Click **Save Changes** to apply your preferences.

By following these steps, you’ll only receive notifications for outages affecting the selected components.

If you need assistance, please reach out via chat or email us at [**support@isdown.app**](mailto:support@isdown.app).

***

**Related Articles**

* [**How to Get Filter Notifications by Outage Severity**](https://help.isdown.app/cloud-monitoring/how-to-get-filter-notifications-by-outage-severity)
* [**What Are the Severities for Outages/Services**](https://help.isdown.app/cloud-monitoring/what-are-the-severities-for-outages-services)
* [**How to Start Monitoring a 3rd-Party Service**](https://help.isdown.app/cloud-monitoring/start-monitoring-a-3rd-party-service)


# Understanding Outage Severity Levels

Here are some of the descriptions for the different states.

* **Operational**&#x20;
  * The service is operating normally without a known problem affecting users.&#x20;
* **Minor Outage**
  * The service may experience intermittent downtime, but a workaround is available.
  * Customers may encounter minor inconveniences due to intermittent service interruptions.
  * A workaround is readily accessible to minimize the impact.
  * Some performance degradation may be noticeable, but overall usability remains feasible.
* **Major Outage**
  * Extensive service disruption with a critical impact on customer data.
  * A significant portion of customers are unable to access the customer-facing service.
  * Core functionality experiences severe disruptions, significantly impacting regular operations.

{% hint style="info" %}
99% of the time, the qualification of the outage state is up to the service provider and IsDown limits to map it to its internal models.&#x20;
{% endhint %}

If you have any questions, you can always send also an email to <support@isdown.app>.

***

**Related Articles**

* [**How to Get Filter Notifications by Outage Severity**](https://help.isdown.app/cloud-monitoring/how-to-get-filter-notifications-by-outage-severity)
* [**How to Filter Outages Affecting Some Specific Components**](https://help.isdown.app/cloud-monitoring/how-to-filter-outages-affecting-some-specific-component-s)


# How to add a website monitor

Keep track of your website and API performance by setting up monitoring in IsDown.

1. **Access the Custom Monitor Page**
   * Once you're on the "**Website Monitors**" page, look for the **"Add First Monitor"** button located in the center or “**Add Monitor”** on the upper right botton.

<figure><img src="/files/NV8BgM08te1C8xnXIDoM" alt=""><figcaption></figcaption></figure>

2. After clicking the “**Add First Monitor**” or **"Add Monitor"** button, you will be redirected to the monitor settings page. Here, you need to provide all the required information about your URL. It's essential to select the appropriate type of URL - **Ping,** **Keyword or SSL**, depending on the type of monitoring you require. Be sure not to overlook any necessary details.

<figure><img src="/files/aNr51Qg5tGOsPl3RrqzD" alt=""><figcaption></figcaption></figure>

3. Once you've entered all the required information, click "**Save"** to create the custom monitor.

<div align="center" data-full-width="true"><figure><img src="/files/pS9teffmpsMXWYaCcw3C" alt=""><figcaption></figcaption></figure></div>

If you need assistance please contact us via chat or email us at [**support@isdown.app**](mailto:support@isdown.app)

***

**Related Articles**

* [**How to Remove a Website Monitor**](https://help.isdown.app/website-monitors/how-to-remove-a-website-monitor)
* [**How to Pause Your Website Monitor**](https://help.isdown.app/website-monitors/how-to-pause-your-website-monitor)
* [**IsDownBot**](https://help.isdown.app/website-monitors/isdownbot)**​**


# How to remove a website monitor

If you no longer need to monitor a specific website or API, you can easily remove it from your IsDown account.

Follow these steps to delete a custom monitor:

1. **Go to the Custom Monitors page**
   * From your dashboard, navigate to "**Website Monitors"**.
2. **Click the Trash Icon**
   * Find the monitor you want to delete and click the **Trash** icon located on the right side.
3. **Confirm Deletion**
   * A confirmation pop-up will appear.
   * Click **"OK"** to confirm, and the monitor will be removed from your list.

<figure><img src="/files/E3WwvOIjjjzh6a8B7NML" alt=""><figcaption></figcaption></figure>

Not sure if you'll need this monitor again? Instead of removing it permanently, consider [**pausing** ](/website-monitors/how-to-pause-your-website-monitor)it. This lets you keep your monitoring data and reactivate it anytime.

If you any questions contact us through chat or email us at <support@isdown.app> — we're here to help.

***

**Related Articles**

* [**How to Add a Website Monitor**](https://help.isdown.app/website-monitors/how-to-add-a-website-monitor)
* [**How to Pause Your Website Monitor**](https://help.isdown.app/website-monitors/how-to-pause-your-website-monitor)
* [**IsDownBot**](https://help.isdown.app/website-monitors/isdownbot)


# How to pause your website monitor

If you need to temporarily stop monitoring a website or API, you can pause the monitor without deleting it.

Follow these steps to pause a website monitor in IsDown.

1. **Go to "Website Monitors"**
   * Navigate to the **Website Monitors** section from the sidebar menu.
2. **Find Your Monitor**
   * You'll see a list of monitors associated with your current profile.
3. **Hover Over the "Active" Button**
   * Locate the monitor you want to pause.
   * Hover over the **"Active"** button — a **"Pause"** option will appear.

<figure><img src="/files/sIBgR4tWrLDuHqpoawyt" alt=""><figcaption></figcaption></figure>

4. Click on it to temporarily to pause the monitoring service.
5. After completing the previous step, you will notice that the status has changed from "**Active**" to "**Paused**".&#x20;

<figure><img src="/files/9KmB8LIIZcKH31hcIKLG" alt=""><figcaption></figcaption></figure>

That’s it! Your website monitor is now paused and won’t send alerts until reactivated.

If you have any questions, please reach us via chat or email us at [**support@isdown.app**](mailto:support@isdown.app).

***

**Related Articles**

* [**How to Add a Website Monitor**](https://help.isdown.app/website-monitors/how-to-add-a-website-monitor)
* [**How to Remove a Website Monitor**](https://help.isdown.app/website-monitors/how-to-remove-a-website-monitor)
* [**IsDownBot**](https://help.isdown.app/website-monitors/isdownbot)


# IsDownBot

IsDownBot is our monitoring bot that keeps a constant eye on your websites and APIs to make sure they're always up and running.

**How It Works**

* **Regular Checks**:

  IsDownBot sends requests at regular intervals — every **1 or 3 minutes**, depending on your configuration.
* **Smart Detection**:

  If **more than 50%** of the requests fail (i.e., return a status code other than **200**), IsDown will **automatically create an incident** and **notify you** about the downtime.

**Global Coverage**

We've servers currently in 3 locations, each with its respective IP, to cover different regions of the globe.

* 146.190.211.155 - North America - New York region;
* 167.99.213.149 - Europe - Amsterdam region;
* 146.190.96.226 - Asia - Singapore region;

All the requests coming from our monitors go with the User Agent:

```ruby
'Mozilla/5.0 (compatible; IsDownBot/1.0;)'
```

If you need assistance, please reach out to us via chat or email at [**support@isdown.app**](mailto:support@isdown.app).

***

**Related Articles**

* [**How to Add a Website Monitor**](https://help.isdown.app/website-monitors/how-to-add-a-website-monitor)
* [**How to Remove a Website Monitor**](https://help.isdown.app/website-monitors/how-to-remove-a-website-monitor)
* [**How to Pause Your Website Monitor**](https://help.isdown.app/website-monitors/how-to-pause-your-website-monitor)


# Best Practices

Website monitors validate real availability from a user perspective.

#### Start from user impact

Before creating a monitor, ask:

* What would hurt customers if it went down?
* What would hurt the business?
* What would slow the team down?
* What would just be annoying?

Not everything needs monitoring.

#### Choose the right monitor type

Each monitor answers a different question:

* HTTP checks response correctness
* Ping checks reachability
* Keyword validates expected content
* SSL prevents certificate surprises

Add monitors that answer your main question, not all possible questions.

#### Avoid redundant monitoring

If one monitor gives a strong signal, adding more rarely adds value. More monitors do not mean better monitoring.


# How to Create Custom Services

Custom Services let you bring the systems you own into the same status view you already trust for third-party providers.

Custom Services are for systems that aren’t monitored automatically. You can create and update incidents for these services, and they’ll appear alongside Website Monitors and 3rd-Party Services on your dashboard and status page.

#### Steps to Create Custom Monitor

1. Sign in to **IsDown**
2. In the left sidebar, choose **Monitors ▸ Custom Services**.
3. Click on **+ New Custom Service** (top right corner)

<figure><img src="/files/7R2NkeLI6t6EzFFKM4aY" alt=""><figcaption></figcaption></figure>

4. **Click Create Custom Service** - Your new service now appears under Custom Services and can be shown on any status page you publish.

<figure><img src="/files/K1ZwgqaCo9uiidNX8OVF" alt=""><figcaption></figcaption></figure>

Need assistance? Contact us via chat or email us at **<support@isdown.app>**.

***

**Related Articles**

* [**How to Delete Custom Services**](https://help.isdown.app/how-to-delete-custom-service)
* [**How to Add an Incident**](https://help.isdown.app/how-to-add-an-incident)
* [**How to Make an Update from an Incident**](https://help.isdown.app/how-to-make-an-update-from-an-incident)


# How to Add an Incident

Log an incident any time a custom service experiences disruption.

#### Before You Start

* Only **Custom Services** can be selected in the *Affected Service* field (3rd-party services are reported automatically by IsDown).

#### Steps to add an Incident

1. In the sidebar, click **Incidents → New Incident**.

<figure><img src="/files/SRc2RnDfyecAbNrcIbPY" alt=""><figcaption></figcaption></figure>

2. **Title** – Enter a short, clear summary (Example: “Checkout API latency”).
3. **Affected Service** – Pick the custom service that’s impacted.
4. **Severity** – Select **Minor** (partial disruption) or **Major** (widespread/critical).
5. **Updates** panel:
   * Choose the initial **Resolution Stage** (defaults to **Investigating**).
   * Type your first **Update Description** (what you know so far).
6. Click **Create Incident**. Notifications are sent instantly to all configured channels.

<figure><img src="/files/mtjuQ04tnvwDxbgu5b2K" alt=""><figcaption></figcaption></figure>

If you need any assistance, please contact us via chat or email us at **<support@isdown.app>.**

***

**Related Articles**

* [**How to make an Update from an Incident**](https://help.isdown.app/how-to-make-an-update-from-an-incident)
* [**How to Delete a Custom Service**](https://help.isdown.app/how-to-delete-custom-service)
* [**How to Create Custom Services**](https://help.isdown.app/custom-monitor/how-to-create-custom-services)


# How to Update an Incident

Use incident updates to share new findings, mitigation steps, or final resolution—all without creating a separate incident.

#### Steps to Update an Incident:

1. Open **Incidents** in the sidebar and click the incident you want to update (**"Edit"** button)
2. Click **➕ Add Update or Mark as Resolved** in the incident timeline.

<figure><img src="/files/JeTifb4BO2946wroYzUb" alt=""><figcaption></figcaption></figure>

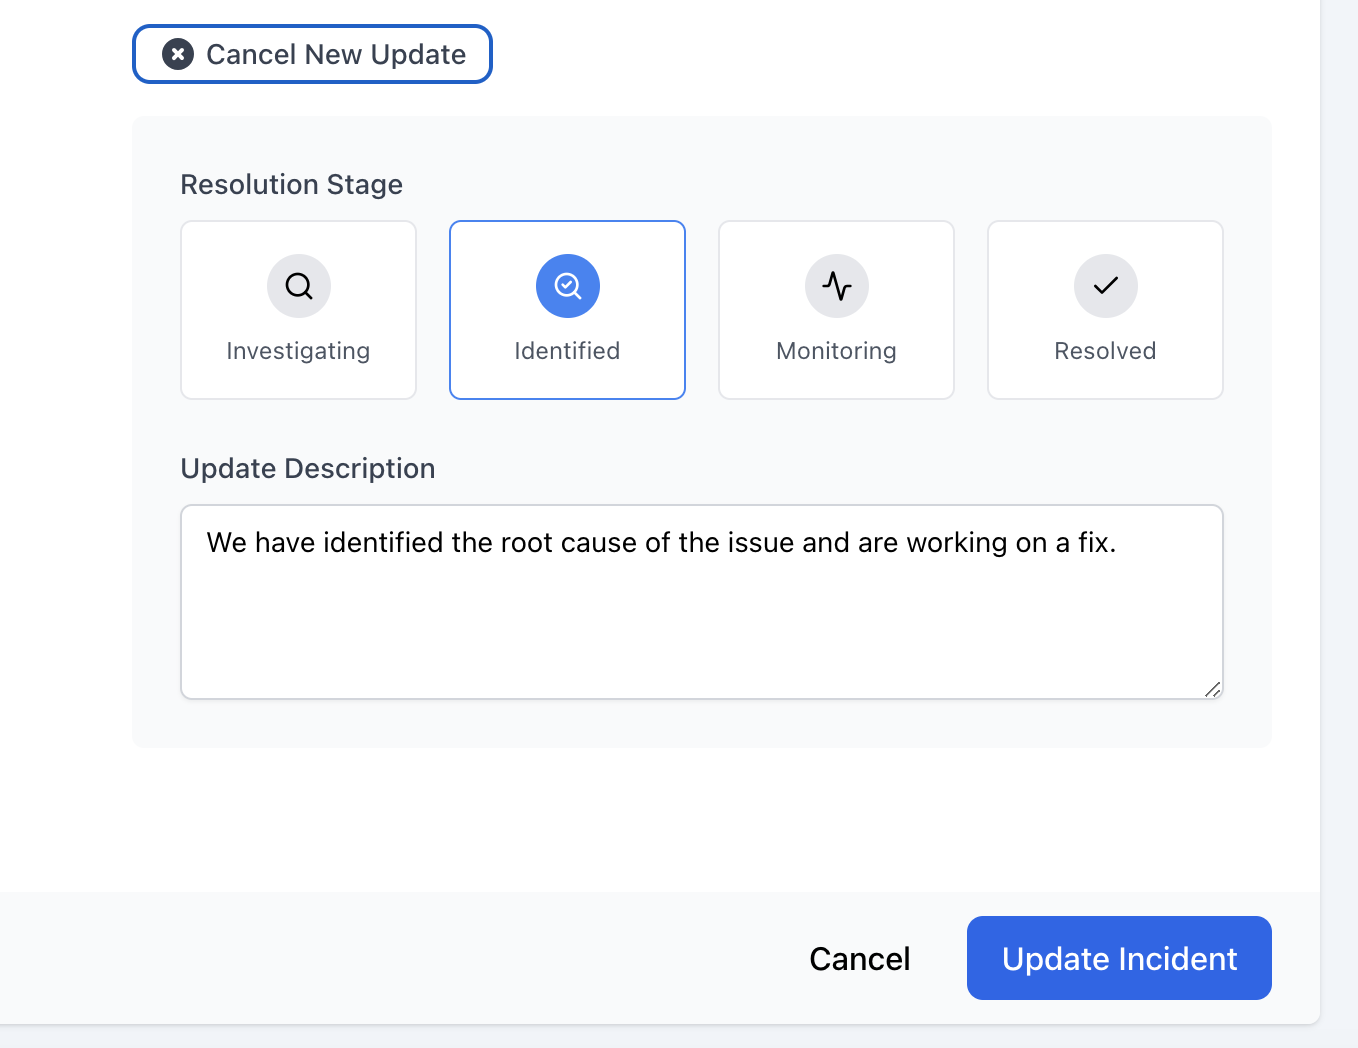
3. **Resolution Stage** – pick the current phase.
4. **Update Description** – enter a concise message (supports Markdown). Examples:

*“We’ve rolled back the faulty release; monitoring recovery.”*

5. *(Optional)* Adjust **Severity** if impact has changed.
6. Hit **Update Incident** to conclude this step.

<figure><img src="/files/3GjHcmTQlFtffmoFGZ1z" alt=""><figcaption></figcaption></figure>

Choose **Resolved** only when:

* All user impact has stopped.
* Fix is deployed and verified.
* You’re ready to close subscriber alerts.

<figure><img src="/files/pHzG0a5IILZeZrcuWQSf" alt=""><figcaption></figcaption></figure>

A “**resolved**” update automatically sets the service status back to **OK**.

Need assistance? Contact us via chat or email us at **<support@isdown.app>.**

***

Related Articles

* [**How to Create Custom Services**](https://help.isdown.app/custom-monitor/how-to-create-custom-services)
* [**How to Delete Custom Service**](https://help.isdown.app/how-to-delete-custom-service)
* [**How to Add an Incident**](https://help.isdown.app/how-to-add-an-incident)


# How to Delete Custom Service

Delete a custom service only when you’re certain you no longer need its incident history or visibility on dashboards/status pages.

Before you delete, remember that this step **permanently erases** incident history, status changes, and logo.

Follow these steps to **Delete Custom Services:**

1. **Log in** to **IsDown** and open **Monitors ➜ Custom Services**.
2. Select **Custom Services** from the sidebar.
3. Find the custom service you wish to remove.
4. Click the **Remove** icon (far-right).

<figure><img src="/files/50VJXTfD5t6VcPbHOXXK" alt=""><figcaption></figcaption></figure>

5. A confirmation dialog appears (see below). Click **OK** to confirm, or **Cancel** to abort.

<figure><img src="/files/OhS5GvE5agkDebcXzRfc" alt=""><figcaption></figcaption></figure>

If you need any assistance, please contact us via chat or email us at **<support@isdown.app>**.

***

**Related Articles**

* [**How to Create Custom Services**](https://help.isdown.app/custom-monitor/how-to-create-custom-services)
* [**How to Add an Incident**](https://help.isdown.app/how-to-add-an-incident)
* [**How to Make an Update from an Incident**](https://help.isdown.app/how-to-make-an-update-from-an-incident)


# Email

Get outages notifications on the email

1. **Sign in** to your IsDown account.
2. Navigate to the "**Alert & Integrations"** section.
3. Locate the **Email "Edit"** button and open the link to enable it.

<figure><img src="/files/ICZI4LD88FXlG6QJ6ik6" alt=""><figcaption></figcaption></figure>

4. In the provided field, enter the email addresses where you want to receive notifications.

* To add multiple emails, separate them with commas (e.g., `user1@example.com, user2@example.com`).

<figure><img src="/files/qFi7vA204vIvbHlDWlPF" alt=""><figcaption></figcaption></figure>

5. Click the **Save Notifications** button to apply your changes.​

If you have any questions, you can always send also an email to **<support@isdown.app>.**

***

**Related Articles**

* [**How to Set Up Slack Notifications**](https://help.isdown.app/notifications/slack)
* [**How to Set Up Microsoft Teams Notifications**](https://help.isdown.app/notifications/microsoft-teams)
* [**How to Set Up Google Chat Notifications**](https://help.isdown.app/notifications/google-chat)


# Slack

Stay informed about service outages by integrating IsDown with Slack. This guide will walk you through the steps to configure Slack notifications for your monitored services.

1. Go to the **"Alert & Integrations"** section;
2. Click the checkbox to enable the Slack notification option;

<figure><img src="/files/q8nyGNmDqEfhB6G3T100" alt=""><figcaption></figcaption></figure>

3. Click **"Add to Slack"**. You will be redirected to Slack screen, where you can choose the channel where the notifications will be sent.&#x20;

<figure><img src="/files/Hq6eQGKZEQmalRspesSj" alt=""><figcaption></figcaption></figure>

4. After successfully setting up, you will be redirected to the IsDown notifications screen, where you can see and confirm the information.&#x20;
5. In the next image, you can see how the notifications will appear in Slack. You will get notifications when there is a new outage, or the service recovers from an outage.&#x20;

   <figure><img src="/files/3ZVCjJSyC8h1plWB4I4T" alt=""><figcaption></figcaption></figure>

{% hint style="info" %}
The Slack channel is selected during the connection process. After the integration is set up, the channel cannot be changed.\
To send notifications to a different channel, you need to disable the Slack notification and connect Slack again.
{% endhint %}

If you have any questions, you can always send an email to **<support@isdown.app>.**

***

**Related Articles**

* [**How to Set Up Email Notifications**](https://help.isdown.app/notifications/email)
* [**How to Set Up Microsoft Teams Notifications**](https://help.isdown.app/notifications/microsoft-teams)
* [**How to Set Up Google Chat Notifications**](https://help.isdown.app/notifications/google-chat)


# Notification Themes

You can choose from 4 themes we've available to fit your Slack Workflow better.

### Normal

<div data-full-width="true"><figure><img src="/files/KY0gdU03LzbnrZ7N9hAF" alt=""><figcaption></figcaption></figure></div>

### Normal without logo

<figure><img src="/files/BHkn1fMrEPED5XMwqMHB" alt=""><figcaption></figcaption></figure>

### Compact

<figure><img src="/files/eyikI3O9lT6WNBQJdGoV" alt=""><figcaption></figcaption></figure>

### Compact without logo

<figure><img src="/files/e1QdYnrCG3nj4Y1Dbx9B" alt=""><figcaption></figcaption></figure>


# Google Chat

Stay informed about service outages by integrating IsDown with Google Chat. This guide will walk you through the steps to configure Google Chat notifications for your monitored services.

How to get the webhooks link:

1. Go to **Google Chat Platform**
2. Choose the space where you will want your notifications
3. Click in the **space channel** title (top, left) to open the menu
4. Click the "**Manage Webhooks**" link
5. Add a name (IsDown.app) and an avatar (<https://isdown.app/icon.jpg>) and click 'Save'
6. Click on the icon "Copy" and paste the link in the field

***

**Related Articles**

* [**How to Set Up Email Notifications**](https://help.isdown.app/notifications/email)
* [**How to Set Up Slack Notifications**](https://help.isdown.app/notifications/slack)
* [**How to Set Up Microsoft Teams Notifications**](https://help.isdown.app/notifications/microsoft-teams)


# Microsoft Teams

This guide shows how to connect IsDown to Microsoft Teams using the Workflows app so that alerts appear in the channel you choose.

Stay up-to-date with service alerts by integrating IsDown with Microsoft Teams. Follow this quick guide to configure notifications directly into your preferred Teams channels, ensuring your team stays informed and ready to act promptly during outages.

{% hint style="danger" %}
**Microsoft Teams are deprecating Office 365 Connectors**, and you'll need to change to Workflows by October 1st, 2024. You can read more [here](https://devblogs.microsoft.com/microsoft365dev/retirement-of-office-365-connectors-within-microsoft-teams/).\
\
If you previously used an Office 365 Connector and alerts have stopped, see this [article](/notifications/microsoft-teams/transitioning-from-office-365-connectors)
{% endhint %}

### Before you start

**Requirements:**

* Microsoft Teams account with permission to create or manage workflows in the target team and channel.

### Create the webhook in Teams

Create the webhook URL in Teams that IsDown will use to send alerts.

1. **Open Workflows in Teams**
   * Go to **Apps** on the left sidebar, search for **Workflows**, and open the app.
   * If Workflows is unavailable, ask your IT admin to enable it for your tenant.
2. **Create a new webhook workflow**
   * Browse templates and select **“Post to a channel when a webhook request is received”**.

<figure><img src="/files/Z2stBtlfqTSGwHQceq3L" alt=""><figcaption></figcaption></figure>

* Set:

  * **Name**: e.g., `IsDown Alerts`

  <figure><img src="/files/7GulG4is8c5WrplEpM3X" alt=""><figcaption></figcaption></figure>

  * **Team** and **Channel**: where alerts should appear

  <figure><img src="/files/6XJUpt2VzLQaCB9Tw0HB" alt=""><figcaption></figcaption></figure>

3. **Generate and copy the webhook URL**

* Click **Add workflow** (or **Create flow**, depending on UI).
* Teams displays a **Webhook URL** – copy it and treat it like a secret.

<figure><img src="/files/GXXJf9dpH4WmzC46JYt2" alt=""><figcaption></figcaption></figure>

* To retrieve it later: open the workflow, click **Edit**, and expand **When a Teams webhook request is received**.

<figure><img src="/files/VQUqJbSfFKVjouBQcafj" alt=""><figcaption></figcaption></figure>

***

### Connect IsDown to Teams

1. Open **IsDown Dashboard → Alerts & Integrations**.
2. Find **Microsoft Teams** and toggle it **On**.<br>

   <div data-full-width="false"><figure><img src="/files/gl2vPCfaYxtX9Mnr6RmN" alt=""><figcaption></figcaption></figure></div>
3. Set **Integration method** to **Workflows**.

<figure><img src="/files/4QXFItxif3VmxpsHDdsp" alt=""><figcaption></figcaption></figure>

4. Paste the Webhook URL from Teams into the **Webhook URL** field.
5. Click **Save**.

***

### Optional: Remove the “template” branding footer

Workflows created from templates may include a branding footer in each message, e.g., “\<User> used a Workflow template to send this card.”

<figure><img src="/files/IOtVLHmGwjeCoifmjRKi" alt="" width="563"><figcaption></figcaption></figure>

To remove it, **duplicate the existing workflow** and update the webhook URL in IsDown. The original workflow cannot have the footer removed.

1. Open **Workflows** in Microsoft Teams.
2. Locate your existing IsDown workflow.
3. Click **…** (More options) and select **Save as**.
4. Give the new workflow a clear name, for example `IsDown Alerts – Custom`.
5. Open the newly created workflow:
   * Click **Edit**.
   * Expand **When a Teams webhook request is received**.
   * Copy the **new webhook URL**.
6. Go to **IsDown Dashboard → Alerts & Integrations → Microsoft Teams**.
7. Replace the existing webhook URL with the **new one**.
8. Click **Save**.

{% hint style="info" %}
The new workflow has a new URL. The original workflow and URL will no longer be used.
{% endhint %}

***

#### Troubleshooting

<table><thead><tr><th width="237.03125">Issue</th><th>Possible cause &#x26; fix</th></tr></thead><tbody><tr><td>Workflows app not found</td><td>Workflows may be disabled or uninstalled. Ask your IT admin to enable it.</td></tr><tr><td>Test URL fails in IsDown</td><td>Ensure Integration method is set to Workflows, not Connector.</td></tr><tr><td>No alerts arrive in Teams</td><td>Open the workflow in Teams, confirm it is Turned on and the channel is correct.</td></tr><tr><td>Alerts stopped after a while</td><td>Check if the workflow owner’s account was disabled or removed. Recreate the workflow under a service account or add co-owners.</td></tr></tbody></table>

If you need assistance, please reach out via chat or email us at [**support@isdown.app**](mailto:support@isdown.app)

***

**Related Articles**

* [**How to Set Up Email Notifications**](https://help.isdown.app/notifications/email)
* [**How to Set Up Slack Notifications**](https://help.isdown.app/notifications/slack)
* [**How to Set Up Google Chat Notifications**](https://help.isdown.app/notifications/google-chat)


# Transitioning from Office 365 Connectors

This guide shows how to migrate to a Workflow‑based integration in minutes.

If your Microsoft Teams alerts from IsDown stopped, you were likely using the legacy Office 365 Connector (“Incoming Webhook”). Microsoft has retired this feature in Teams and replaced it with the Workflows app.

### Why alerts stopped?

Microsoft phased out Office 365 Connectors. The URLs used no longer accept posts. The connector may still appear in the UI, but messages will not reach Teams.

To restore alerts:

* Create a new Webhook in Workflows
* Update the URL in IsDown

{% hint style="info" %}
No changes to alert rules or status‑page selections in IsDown are needed—only the Teams connection.
{% endhint %}

***

### Migration checklist

You don’t edit the old connector. Create a new Workflow Webhook and update the URL in IsDown.

### 1. Identify the channel

1. Open Teams and go to the channel where IsDown alerts **used** to appear.
2. Note the **Team name** and **Channel name** for the new workflow.

### 2. Create the new Teams endpoint (Workflow)

1. Follow our guide in this [article](/notifications/microsoft-teams).&#x20;

### 3. Update the URL in IsDown

1. Open **IsDown Dashboard → Alerts & Integrations → Microsoft Teams**.
2. Set **Integration method** to **Workflows**.
3. Paste the **new Webhook URL** into the **Webhook URL** field.
4. Click **Save**.

Once complete, you can ignore or remove the old Office 365 Connector in Teams.

***

### Technical notes for admins

#### 1. Workflow ownership and lifecycle

* Each workflow is **owned by the user** who created it.
* If that account is disabled, the workflow stops running.
* For critical alerts, consider:
  * Creating the workflow under a dedicated **service account**, or
  * Adding **co‑owners** in Teams Workflows/Power Automate so others can maintain it.

#### 2. Private channels

* Workflows can post to private channels if:
  * The workflow creator is a member, and
  * Tenant policies allow Workflows/Power Automate.
* When migrating alerts from a connector in a private channel, create the workflow while signed in with an account that has access.
* If permission errors occur, test first in a standard channel, then adjust private channel permissions with your Teams/M365 admin.


# How to Set Up PagerDuty Integration

Integrate IsDown with PagerDuty to receive real-time alerts about third-party service outages directly within your incident management workflow. This guide will walk you through the steps to configure

1. After you sign-in/sign-up in the top bar menu, click "**Alert &** **Integrations"**.
2. Select **Add** on **PagerDuty** check box - You will be redirected to your PagerDuty account.

<figure><img src="/files/tDmPn9ZbPZDTjEQU8TAr" alt=""><figcaption></figcaption></figure>

3. Click **Connect to PagerDuty**.
4. Enter your PagerDuty login credentials.&#x20;

   <figure><img src="/files/mUAgSXfqmtqK1bRgq3sd" alt=""><figcaption></figcaption></figure>
5. You'll be redirect to the PagerDuty integration page. Sign-in if needed and select the service(s) you want to send alerts to.&#x20;

   <figure><img src="/files/Blqba9u73oox85AIlpXa" alt=""><figcaption></figcaption></figure>
6. Click **Connect**.
7. You'll be redirected back to the IsDown app and you can confirm your pagerduty connection.&#x20;

Have questions? We're here to help—contact us via chat or email us at **<support@isdown.app>.**

***

**Related Articles**

* [**How to Set Up Email Notifications**](https://help.isdown.app/notifications/email)
* [**How to Set Up Slack Notifications**](https://help.isdown.app/notifications/slack)
* [**How to Set Up Microsoft Teams Notifications**](https://help.isdown.app/notifications/microsoft-teams)


# How to Set Up Opsgenie Integration

Integrate IsDown with Opsgenie to receive real-time alerts about third-party service outages directly within your incident management workflow. This guide will walk you through the steps to configure.

1. After you sign in/sign up in IsDown, in the top bar menu, click "**Alerts & Integrations**".
2. Select "**Add**" on **Opsgenie** check box (Image 1) and **inable the Integration** (Image 2).

<figure><img src="/files/aoYVjeNmkJyyq9gux9Y2" alt=""><figcaption><p>Image 1</p></figcaption></figure>

<figure><img src="/files/iEzwfuGgDiKyLTaKemIx" alt=""><figcaption><p>Image 2</p></figcaption></figure>

3. Next, go to **Opsgenie** to get the API Key
   1. Go the menu item "**Teams"**
   2. Choose or create the team you want the integration for
   3. In the sidebar click "**Integrations"**
   4. Top right corner, click the button "**Add integration"**
   5. Search for API and click the API type integration
   6. Give the integration a name (e.g., IsDown)
   7. Since we only need to create and update alerts, you can remove access to everything else in the Edit section.

      <figure><img src="/files/701fzXn8GTxKgwgmM7EC" alt=""><figcaption></figcaption></figure>
4. Click the button "**Turn on integration".**
5. Copy the API key, head to the IsDown website, and add it to the form.
6. Choose the region where your Opsgenie instance is located: EU or US.
7. Click "**Save Changes"**

And it's done. Now, when an outage is open, we will create an alert in Opsgenie and close it when the vendor closes the status update.

Have questions? We're here to help—contact us via chat or email us at **<support@isdown.app>**.

***

**Related Articles**

* [**Set Up PagerDuty Integration**](https://help.isdown.app/integrations/setup-pagerduty)
* [**Set Up Slack Notifications**](https://help.isdown.app/notifications/slack)
* [**How to Filter Outages by Severity**](https://help.isdown.app/cloud-monitoring/how-to-get-filter-notifications-by-outage-severity)


# How to Set Up FireHydrant Integration

Integrate IsDown with FireHydrant to receive real-time alerts about third-party service outages directly within your incident management workflow.

1. After you sign in/sign up in IsDown, click "**Alerts & Integrations"** in the sidebar.
2. Select **"Add" on** FireHydrant check box (Image 1) and **enable the Integration** (Image 2).&#x20;

<figure><img src="/files/zb1p4S6WWwKHdLSmwfxK" alt=""><figcaption><p>Image 1</p></figcaption></figure>

<figure><img src="/files/D3j1SwpGtyofbqdp9I8R" alt=""><figcaption><p>Image 2</p></figcaption></figure>

1. Next, go to **FireHydrant** to get the API Key
   1. Go to the menu item **Settings** (top right)
   2. In the sidebar, click **API Keys**
   3. In the top right corner, click the button **Create API key**
   4. Give the API Key a name (e.g., IsDown)
   5. Click **Create**
   6. Copy the API key, head to the IsDown website, and add it to the form.
   7. Click **Save Changes**

And it's done. When an outage starts, we will create an alert in FireHydrant and close it when the vendor closes the status update.

Have questions? We're here to help—contact us via chat or email us at **<support@isdown.app>**.

***

**Related Articles**

* [**How to Set Up PagerDuty Integration**](https://help.isdown.app/integrations/setup-pagerduty)
* [**How to Set Up Slack Notifications**](https://help.isdown.app/notifications/slack)
* [**How to Filter Outages by Severity**](https://help.isdown.app/cloud-monitoring/how-to-get-filter-notifications-by-outage-severity)


# How to Set Up Rootly Integration

Integrate IsDown with Rootly to receive real-time alerts about third-party service outages directly within your incident management workflow.

1. Go to your **Rootly Account**
2. Select **"Alerts"** in the Sidebar and then the "**Alert Sources" tab.**
3. Click "**+ Add Alert Source**"
4. Search for "**Generic Webhook**", and click to open. Choose a name, like "IsDown" and click Create

<figure><img src="/files/qbxFmgmkw91W32GazjKY" alt=""><figcaption><p>Image 1</p></figcaption></figure>

5. You will have to fill in several text fields to complete the setup.
6. Go to **Step 2,** and fill the inputs with these values.
   1. "Alert Title JsonPath Locator" -> `$.title`
   2. "Notification Target Type JsonPath Locator" -> `$.target_type`
   3. "Notification Target ID JsonPath Locator" -> `$.target_id`
   4. Enable (if you want Auto Resolve)
      1. "locate the identifier" -> `$.external_id`
      2. "*where* the field" -> `$.status`
      3. "*what* the field" -> `resolved`
7. Go to **Step 1** and grab the Authorization Header - Credentials (TOKEN)
8. Go to your **IsDown account**, and the "**Alerts & Integrations"** screen in the sidebar.
9. Select the **Rootly** check box.&#x20;

<figure><img src="/files/CtXQfa2kMQqvr0MNvuhm" alt=""><figcaption><p>Image 2</p></figcaption></figure>

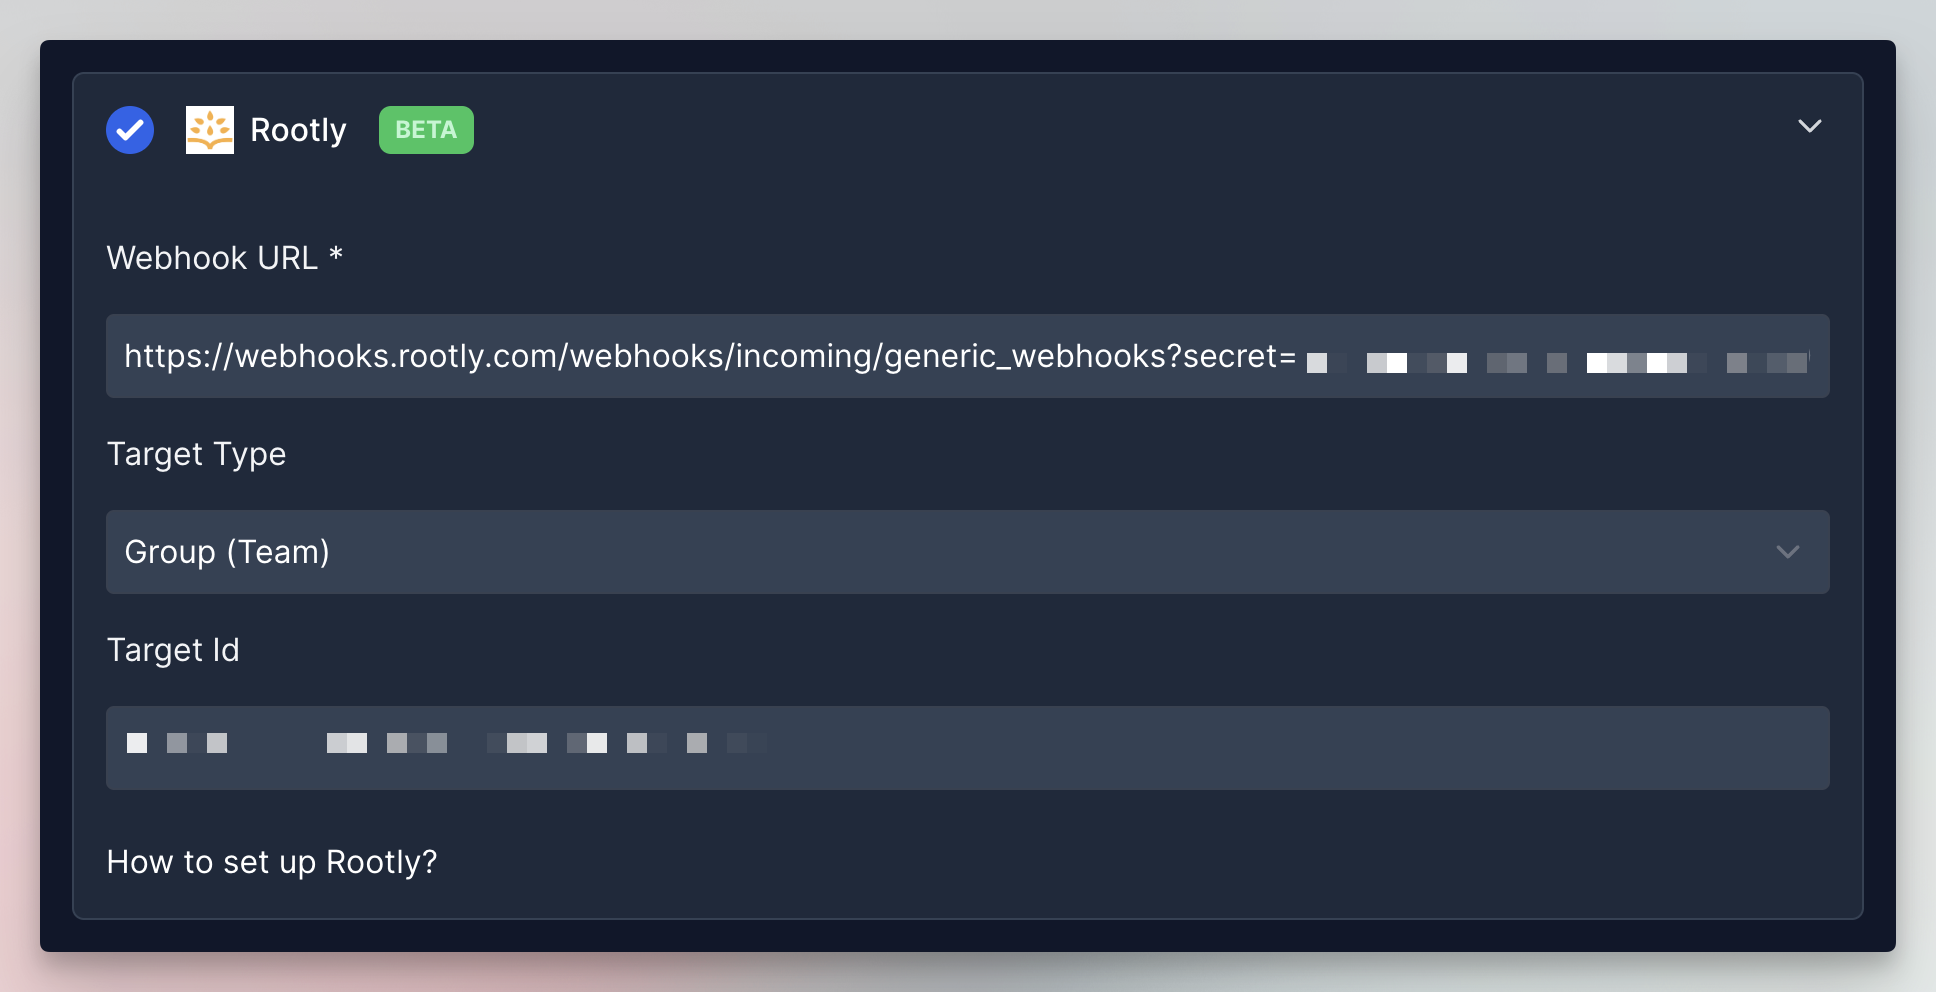
<figure><img src="/files/ywZVqavrYkCWp5uST2Vj" alt=""><figcaption><p>Image 3</p></figcaption></figure>

10. In the **Webhook URL (Image 3),** paste the value you grabbed in 5.2 after this URL:

`https://webhooks.rootly.com/webhooks/incoming/generic_webhooks?secret=TOKEN`

11. For the Targets, it's optional. You will need to fill this field if you want to Page someone.
12. Choose the Target Type. It's available by "Service", "Team" or "Escalation Policy".
13. Grab the UUID in Rootly for the Service/Team/Escalation Policy you want.
14. Click **Save Changes**

And it's done. When an outage starts, we will create an alert in Rootly and close it when the vendor closes the status update.

Have questions? We're here to help—contact us via chat or email us at **<support@isdown.app>**.

***

**Related Articles**

* [**How to Set Up Opsgenie Integration**](https://help.isdown.app/integrations/setup-opsgenie)
* [**Set Up Admin SSO**](https://help.isdown.app/accounts/setup-admin-sso)
* [**How to Add a Website Monitor**](https://help.isdown.app/website-monitors/how-to-add-a-website-monitor)


# How to Set Up incident.io Integration

Integrate IsDown with incident.io to receive real-time alerts about third-party service outages directly within your incident management workflow.

1. Go to your [**incident.io**](https://incident.io) **Account**
2. Select "**Alerts**" in the Sidebar and then the "**Sources**" tab.
3. Click **"Connect an alert source"**
4. Search for "http" and check the option. Choose a name, like "IsDown" and click Continue.

   <figure><img src="/files/IvFYrpswOYBysZAh5l7k" alt=""><figcaption></figcaption></figure>
5. Grab the value from URL and the token after the string "Bearer".
6. Go to the **IsDown account,** in the **"Alerts & Integration"** section.&#x20;
7. Fill the values of Webhook URL with the incident.io URL value, and the Token with the string after "Bearer"

<figure><img src="/files/qxtrka4otLmHYKh0G8Jl" alt=""><figcaption><p>Image 1</p></figcaption></figure>

<figure><img src="/files/8np3TXERLsJLNhbxO6yv" alt=""><figcaption><p>Image 2</p></figcaption></figure>

8. In IsDown, click **Save Changes**. After saved go back to the incident.io section (in IsDown) and click on the "**Send test alert**" button.
9. Go back to incident.io, and configure the fields against the information that goes in the payload that IsDown sends. Click "**Save"** in the end.

IsDown will now opening and closing alerts in incident.io. This will respect the notification settings that you've for each service.

Have questions? We're here to help—contact us via chat or email us at **<support@isdown.app>.**

***

**Related Articles**

* [**How to Set Up Opsgenie Integration**](https://help.isdown.app/integrations/setup-opsgenie)
* [**Set Up Admin SSO**](https://help.isdown.app/accounts/setup-admin-sso)
* [**How to Add a Website Monitor**](https://help.isdown.app/website-monitors/how-to-add-a-website-monitor)


# How to Set Up Datadog Integration

1. Use your existing account or create a new one at <https://isdown.app/users/sign_up>.
2. Log in to your account and go to **"Alerts & Integrations"** section.
3. Click on the checkbox to **Add** **Datadog.**

<figure><img src="/files/SEjzcix4lgMDBzLXsRp7" alt=""><figcaption></figcaption></figure>

4. You are then redirected to Datadog to authorize the application. IsDown creates an API key that only has access to what IsDown needs to send events and service checks to Datadog.

<figure><img src="/files/x66F6J3NBZa8i4LUFVle" alt=""><figcaption></figcaption></figure>

**IsDown will not read any data from your Datadog account. The requested scope only allows us to send data and not read it.**

5. After authorization, you are redirected to IsDown.
6. A new dashboard will be created in Datadog.

   <figure><img src="/files/zRESQKFLsEgIB76IbyRA" alt=""><figcaption></figcaption></figure>
7. Other notes
   1. We send two types of data. Checks and Events.
   2. In the case of the Events, we will send the outage information with tags. One of the tags identifies the profile from where it is sent. This will allow you to set up your Datadog account alerts based on the source profile sent. E.g., Identify outages that might be critical to your platform vs non-critical ones.

      \
      **Tags sent in each event:**\
      \- "source:isdown"\
      \- "isdown:SERVICE\_URLNAME" , e.g., 'isdown:azure'\
      \- "isdown:profile-PROFILE\_URLNAME, e.g. 'isdown:profile-all-company'<br>
   3. Apart from the base widgets, you can create your own. See more in [How to Create Custom Widgets in Datadog](/integrations/how-to-set-up-datadog-integration/how-to-create-custom-widgets-in-datadog).

Need assistance? Reach out via chat or email us at [**support@isdown.app**](mailto:support@isdown.app).

***

**Related Articles**

* [**How to Set Up PagerDuty Integration**](https://help.isdown.app/integrations/setup-pagerduty)
* [**How to Set Up Slack Notifications**](https://help.isdown.app/notifications/slack)
* [**How to Filter Outages by Severity**](https://help.isdown.app/cloud-monitoring/how-to-get-filter-notifications-by-outage-severity)


# How to Create Custom Widgets in Datadog

Learn how to create and customize widgets in Datadog to visualize your monitoring data effectively. This guide walks you through the steps to set up custom widgets tailored to your needs.

By default, IsDown creates a dashboard with some useful widgets that are more focused on real-time data and trying to understand what's wrong with your vendors quickly.

On this page, we'll list other widgets that should be available with the current data set sent from IsDown to Datadog.

### Services with the most outages

<figure><img src="/files/zdqKnLZcsy2HrTy6cBap" alt=""><figcaption></figcaption></figure>

<details>

<summary>How to add the widget?</summary>

Click the "Add Widgets" button, choose the Treemap widget, then click JSON in the "Graph your data" and paste the following JSON code.

{% code overflow="wrap" lineNumbers="true" %}

```json
{
    "type": "treemap",
    "requests": [
        {
            "response_format": "scalar",
            "queries": [
                {
                    "data_source": "events",
                    "name": "query1",
                    "indexes": [
                        "*"
                    ],
                    "compute": {
                        "aggregation": "cardinality",
                        "metric": "@evt.id"
                    },
                    "group_by": [
                        {
                            "facet": "@aggregation_key",
                            "limit": 100,
                            "sort": {
                                "order": "desc",
                                "aggregation": "cardinality",
                                "metric": "@evt.id"
                            }
                        }
                    ],
                    "search": {
                        "query": "source:isdown status:(warn OR error)"
                    }
                }
            ],
            "formulas": [
                {
                    "formula": "query1"
                }
            ]
        }
    ]
}
```

{% endcode %}

</details>

### Number of outages by time and service

<figure><img src="/files/TG5GuTO35CjERGFNPy81" alt=""><figcaption></figcaption></figure>

<details>

<summary>How to add the widget?</summary>

Click the "Add Widgets" button, choose the Timeseries widget, then click JSON in the "Graph your data" and paste the following JSON code.

```json
{
    "type": "timeseries",
    "requests": [
        {
            "style": {
                "palette": "semantic",
                "type": "solid",
                "width": "normal"
            },
            "type": "bars",
            "formulas": [
                {
                    "formula": "query1"
                }
            ],
            "queries": [
                {
                    "data_source": "events",
                    "name": "query1",
                    "indexes": [
                        "*"
                    ],
                    "compute": {
                        "aggregation": "cardinality",
                        "metric": "@evt.id",
                        "interval": 86400000
                    },
                    "group_by": [
                        {
                            "facet": "@aggregation_key",
                            "limit": 10,
                            "sort": {
                                "order": "desc",
                                "aggregation": "cardinality",
                                "metric": "@evt.id"
                            }
                        }
                    ],
                    "search": {
                        "query": "source:isdown status:(warn OR error)"
                    }
                }
            ],
            "response_format": "timeseries"
        }
    ]
}
```

</details>

### Dashboard with checks

<figure><img src="https://s3.amazonaws.com/dd-app-listings/isdown-isdown/media/health_dashboard_cloud_providers.jpg" alt=""><figcaption></figcaption></figure>

<details>

<summary>How to add the widget?</summary>

To add all these checks, you will need to do it one by one.&#x20;

1. Go to the Dashboard you will want to add these widgets.
2. Click "Add Widget"
3. Search for "Check"

   <figure><img src="/files/37C13IupXQnzAEaxvJhJ" alt=""><figcaption></figcaption></figure>
4. Fill in the fields according to the picture. In Reported By choose the service (host) that you want to track.

   <figure><img src="/files/pN7xJrJ5QzHZCjmyNr7A" alt=""><figcaption></figcaption></figure>
5. Duplicate and replace this widget for how many services you want it for.

</details>

***

**Related Articles**

* [**How to Set Up Datadog Integration**](https://help.isdown.app/integrations/setup-datadog)
* [**How to Create Dashboards in Datadog**](https://docs.datadoghq.com/dashboards/)
* [**Datadog Widget Documentation**](https://docs.datadoghq.com/dashboards/widgets/)


# How to Set Up StatusHub Integration

Integrate IsDown with StatusHub to automatically create and update incidents on your StatusHub page whenever monitored services experience downtime.

1. Sign in/sign up and enter your IsDown account
2. Click the **Alert &** **Integrations** link on the left sidebar.
3. Select the **StatusHub** check box.

<figure><img src="/files/0XEoRPPXPqXb0fNJI8il" alt=""><figcaption></figcaption></figure>

4. Toggle the **"Add"** check box button and ensure the integration is enabled by toggling **"Enable StatusHub Integration"**

<figure><img src="/files/YR7lDxkartXRnUlUyZsZ" alt=""><figcaption></figcaption></figure>

Open a new tab and log in to your **StatusHub account.**

5. Navigate to the **Service** you want to integrate.
6. Click **Edit** → select **Integrations** → select **IsDown**.
7. Copy the provided **Webhook URL**.

<figure><img src="/files/4pLMero2um96cOfzimCK" alt=""><figcaption></figcaption></figure>

8. Go back to the IsDown account and paste the webhook within the service.
9. Decide if you want to publish the Incident right away from IsDown, or just create the incident in Draft mode.
10. Click **Save Changes** to finish the setup.&#x20;

If you experience any issues or need assistance, please contact our support team through the in-app chat or via email at **<support@isdown.app>**.

***

**Related Articles**

* [**How to Set Up Incident.io Integration**](https://help.isdown.app/integrations/how-to-set-up-incident.io-integration)
* [**How to Set Up PagerDuty Integration**](https://help.isdown.app/integrations/how-to-set-up-pagerduty-integration)
* [**How to Set Up Opsgenie Integration**](https://help.isdown.app/integrations/how-to-set-up-opsgenie-integration)


# How to Set Up Squadcast Integration

Integrate IsDown with Squadcast to receive real-time alerts about third-party service outages directly within your incident management workflow

1. Sign in/sign up and enter your **IsDown account**
2. Click the **Alert & Integrations** link on the left sidebar.
3. Select the **Squadcast** check box.&#x20;
4. Get your **webhook URL from your Squadcast account**
   * Go to the services pages and select or create a new service
   * Click "**Add Alert Source**"
   * Search for Webhook and select it
   * **Copy the Webhook URL to the IsDown form**

<figure><img src="/files/7c9GvH8SF3KXwLobJLUL" alt=""><figcaption><p>Image 1</p></figcaption></figure>

5. Returning to your **IsDown account,** select **Squadcast box** and click on the **"Add"** botton.
6. Then **past the Webhook URL**, and  finish by **"Save Changes"** in the bottom right to save the alert sources.

<figure><img src="/files/JksUX9lZApaXgQO259CN" alt=""><figcaption><p>Image 2</p></figcaption></figure>

<figure><img src="/files/zsqNIBLzDuW0k3WhlXoS" alt=""><figcaption><p>Image 3</p></figcaption></figure>

Have questions? We're here to help—contact us via chat or email us at <support@isdown.app>.

***

**Related Articles**

* [**How to Set Up PagerDuty Integration**](https://help.isdown.app/integrations/how-to-set-up-pagerduty-integration)
* [**How to Set Up Opsgenie Integration**](https://help.isdown.app/integrations/how-to-set-up-opsgenie-integration)
* [**How to Set Up FireHydrant Integration**](https://help.isdown.app/integrations/how-to-set-up-firehydrant-integration)


# How to Set Up Zendesk Integration

Integrate IsDown with Zendesk to automatically create and update support tickets when third-party service outages occur, ensuring your support team stays informed and can respond promptly.

1. Go to your **Zendesk Account**
   * Click on **View Profile** in the top right corner<br>

     <figure><img src="/files/JXqMWttrgHa3yp1z2asx" alt=""><figcaption></figcaption></figure>
   * On the left sidebar, click **"Manage in Admin Center"**
   * On the left sidebar, go to the group **"Apps and Integrations"** and **click "Zendesk API"**
   * Enable **"Token access"** and create an API token. **Please save it so you can use it further in the tutorial.**
2. Go to your IsDown account in **Alerts & Integrations.**

<figure><img src="/files/3I5Us57iuo3Qfo7lU2yH" alt=""><figcaption></figcaption></figure>

3. Select **Add** on Zendesk check box and fill in all the required fields.

<figure><img src="/files/9Cujro2edyNukOJdOecu" alt=""><figcaption></figcaption></figure>

4. **Workspace URL:** Enter your Zendesk subdomain.
5. **User Email:** Enter the email address associated with your Zendesk account.
6. **API Key** that you created in the first step.
7. Click **Save Changes** to finalize the integration.

Need assistance? Contact us via in-app chat or email us at **<support@isdown.app>**.

***

**Related Articles**

* [**How to Set Up Opsgenie Integration**](https://help.isdown.app/integrations/how-to-set-up-opsgenie-integration)
* [**How to Set Up PagerDuty Integration**](https://help.isdown.app/integrations/how-to-set-up-pagerduty-integration)
* [**How to Set Up FireHydrant Integration**](https://help.isdown.app/integrations/how-to-set-up-firehydrant-integration)


# How to Set Up Atlassian Statuspage Integration

Integrate IsDown with Atlassian Statuspage to automatically update your public status page when third-party service outages occur, ensuring your users are informed in real-time.

1. First, you need to create an **API Key for IsDown**. Go to your **Statuspage.io account** and click **"API Info"** in your profile picture (top right).
2. Create a key and save it. At the bottom of the page, you can also find the Page ID for the status page that you'll want to update.
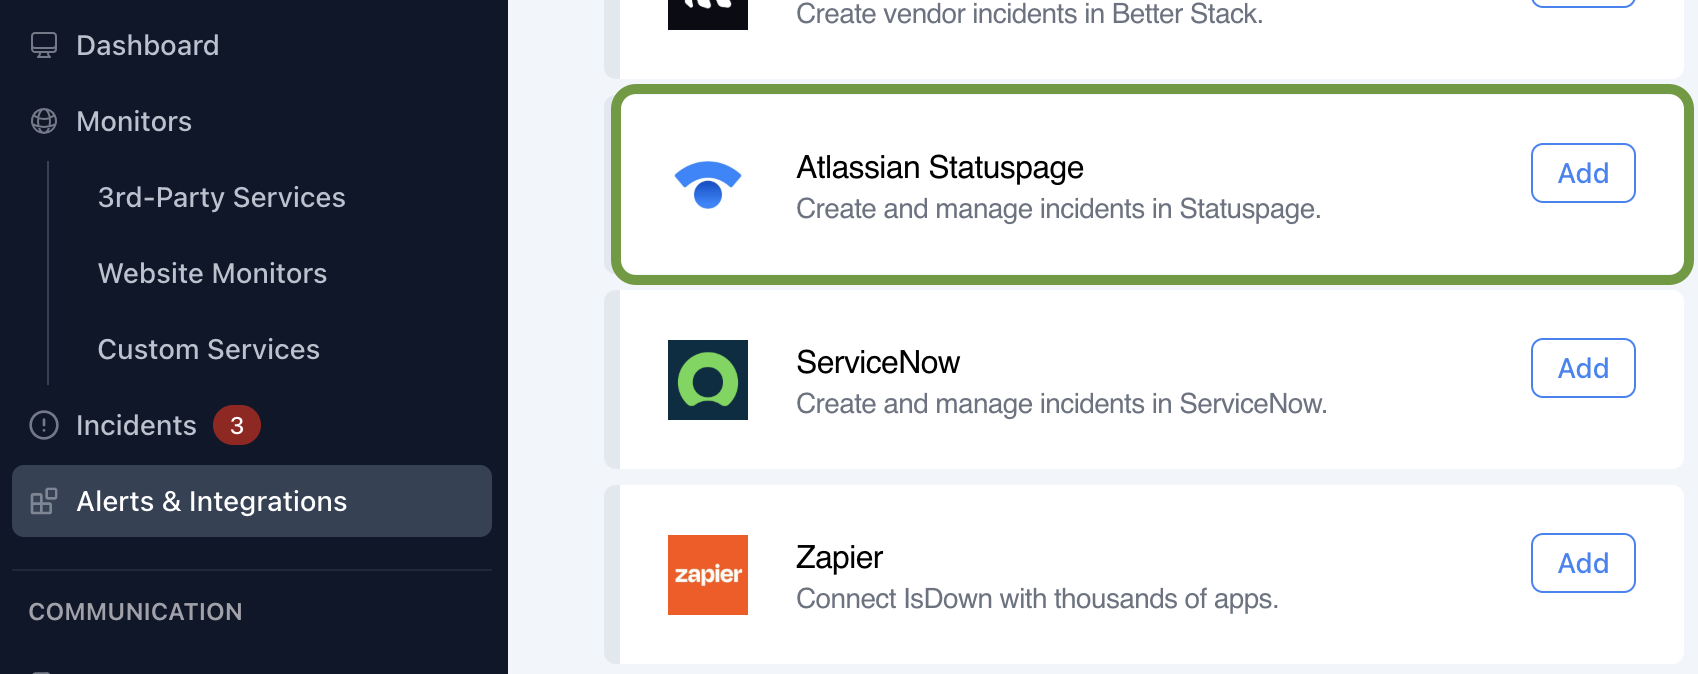
3. Go to IsDown, **"Alerts & Integrations"** section.

<figure><img src="/files/rwoVft5KiOCxHHhorUb9" alt=""><figcaption></figcaption></figure>

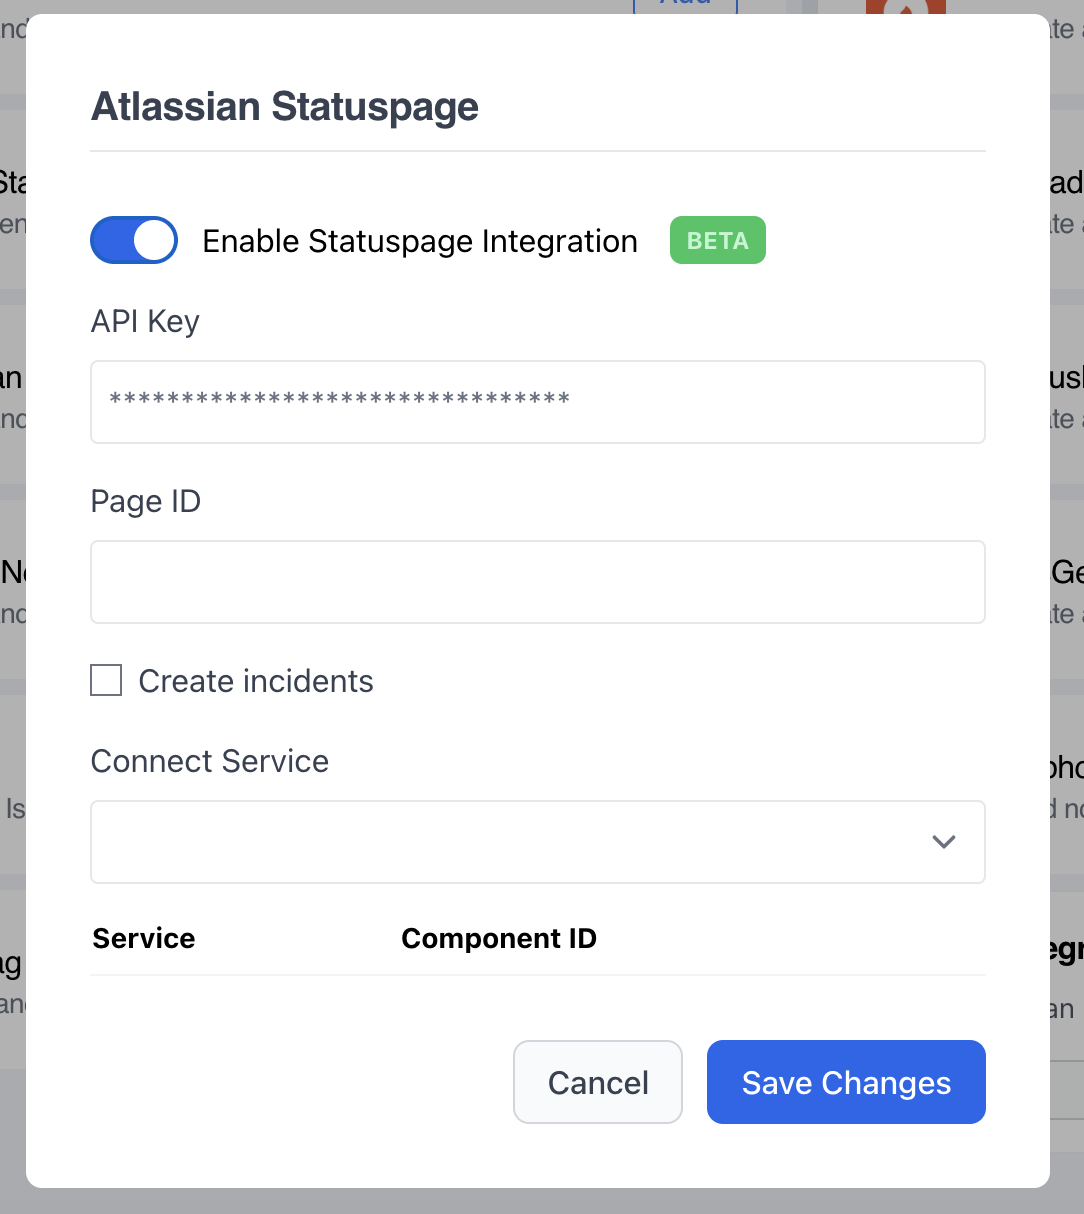
4. Select "**Atlassian Statuspage"** and fill in the required fields

* Paste the API Key
* Past the Statuspage Page ID
* Check the checkbox if you want to create incidents. **Don't check it if you only want to update the components' status.**
* Select the services you want to connect. To make the connection, we need the component ID, which you can get via the URL of the components in Statuspage.io.
* You're done. Once the status of the services changes in IsDown, we will update it automatically on the Statuspage account.

<figure><img src="/files/cGTl9ixvHffTg5QbbXoB" alt=""><figcaption></figcaption></figure>

Have any questions? We're here to help—contact us via chat or email us at <support@isdown.app>.

***

**Related Articles**

* [**How to Set Up StatusHub Integration**](https://help.isdown.app/integrations/how-to-set-up-statushub-integration)
* [**How to Customize a Status Page**](https://help.isdown.app/status-page/how-to-customize-a-status-page)
* [**Set Up Status Page SSO**](https://help.isdown.app/status-page/set-up-status-page-sso)


# How to Set Up Grafana

1. Use your existing account or create a new one at <https://isdown.app/users/sign_up>.
2. Log in to your account and go to **"Alerts & Integrations"** section.
3. Click on the 'Add" next to Grafana pane&#x6C;**.**
4. Click on the check box to enable
5. Go to your Grafana instance
   1. To get the token. You will need to create a new cloud access policy
      1. Click on Administration > Users and Access > Cloud Access Policies
      2. Click button Create access policy
      3. Fill the Display Name and Name and **give permissions for logs:write**
      4. After, click "Add Token" under the new create policy
      5. Create the token and save the value as you will need it for the integration.
   2. Get the Loki URL where we can push the events
      1. Go to Connections > Data Source and get the URL for Loki. Something similar to `https://logs-prod-xxx.grafana.net`&#x20;
   3. Get the User ID from the selected Connection, in the Authentication section.
6. Go back to IsDown and fill in the fields with the collected information, and click Save.


# MCP Server

Connect IsDown to AI assistants like Claude using the Model Context Protocol (MCP)

Connect IsDown to AI assistants like Claude using the Model Context Protocol (MCP).\
Query your monitoring data ( services, incidents, and status boards directly through\
conversational AI.

### What is MCP?

The Model Context Protocol (MCP) is an open standard that allows AI assistants to\
securely connect to external data sources. With IsDown's MCP server, you can ask your AI assistant questions like:

* "What services are currently experiencing issues?"
* "Show me recent incidents for AWS"
* "What's the status of my production services board?"

### Prerequisites

Before setting up the MCP integration, you need:

1. A Business or Enterprise plan
2. An **API key** from your IsDown account
3. **Claude Desktop** (or another MCP-compatible AI client)

### Setup Instructions

#### Step 1: Enable MCP Access

Contact IsDown support at **<support@isdown.app>** to enable MCP access for your\
organization.

#### Step 2: Get Your API Key

1. Go to **Settings** → **API Keys** in your IsDown dashboard
2. Click **Create New API Key**
3. Copy the API key and store it securely—you won't be able to see it again

#### Step 3: Configure Claude Desktop

1. Open Claude Desktop
2. Go to **Settings** → **Developer** → **Edit Config**
3. Add the following configuration to your `claude_desktop_config.json` file:

```json
{                                                                                       
  "mcpServers": {                                                                       
    "isdown": {                                                                         
      "command": "npx",                                                                 
      "args": [                                                                         
        "mcp-remote",                                                                   
        "https://isdown.app/mcp",                                                   
        "--header",                                                                     
        "Authorization:${AUTH_HEADER}"                                                  
      ],                                                                                
      "env": {                                                                          
        "AUTH_HEADER": "Bearer YOUR_API_KEY_HERE"                                       
      }                                                                                 
    }                                                                                   
  }                                                                                     
}                                                                                       
```

4. Replace YOUR\_API\_KEY\_HERE with your actual API key
5. Save the file and restart Claude Desktop

   <div data-gb-custom-block data-tag="hint" data-style="info" class="hint hint-info"><p>The mcp-remote package will be automatically installed when Claude Desktop starts. Make sure you have Node.js installed on your computer.</p></div>

#### Step 4: Verify the Connection

After restarting Claude Desktop, you should see "isdown" listed as a connected MCP\
server. Try asking Claude:

* "What services am I monitoring on IsDown?"
* "Are there any ongoing incidents?"

#### Available Tools

The MCP server provides six read-only tools:

| Tool                 | Description                                      |
| -------------------- | ------------------------------------------------ |
| list\_services       | List all services you are monitoring             |
| get\_service\_status | Get the current status of a specific service     |
| search\_services     | Search for services by name                      |
| list\_incidents      | List incidents (filter by service, status, date) |
| get\_incident        | Get detailed information about an incident       |
| list\_boards         | List your status boards                          |

#### Filtering by Board

You can filter services and incidents by a specific status board using the board\
parameter. Use list\_boards first to see your available boards and their keys.

#### Example Queries

Here are some example questions you can ask your AI assistant:

* "List all my monitored services that are currently down"
* "What incidents happened on GitHub last week?"
* "Show me the status of services on my 'production' board"
* "Are there any major outages affecting my services right now?"
* "Get details about incident #12345"

#### Troubleshooting

**Connection Failed**

1. Verify your API key is correct
2. Ensure MCP access is enabled for your account
3. Check that you're using https\:// (not http\://)
4. Restart Claude Desktop after config changes

**Tools Not Appearing**

1. Check Claude Desktop logs for errors
2. Verify the JSON syntax in your config file
3. Ensure npx is available in your PATH

**Authentication Errors**

Contact <support@isdown.app> to verify MCP is enabled for your organization.


# How to share a Status Page

Share your IsDown status page with your team and stakeholders to provide real-time visibility into the status of your monitored services

1. Sign in to your **IsDown account**
2. Choose the profile you want to share in the left sidebar
3. Click **Status Page**
4. Go to **General** Options and click on the check box to **publish Status Page.**

<figure><img src="/files/WfvQnWtVA99PLbF8mJst" alt=""><figcaption></figcaption></figure>

5. After **Save Changes**, you'll have a direct link to the Status Page.

<figure><img src="/files/PVk7hvOl40agwp2TuqEe" alt=""><figcaption></figcaption></figure>

6. Check other options to customize your dashboard for your team and clients. Here are the options you can customize:
   * Logo
   * Company Name
   * Link in the Logo / Company Name
   * Short Url ( by default, you have a UUID )
   * Theme
   * Show Past Incidents
   * Show Maintenance Feed
   * Protect Status Page behind a password

<figure><img src="/files/bLwtuB70krVZSWsS1wyj" alt=""><figcaption></figcaption></figure>

If you have any questions or need help, please contact us via in-app chat or email us at **<support@isdown.app>**.

***

**Related Articles**

* [**How to Customize a Status Page**](https://help.isdown.app/status-page/how-to-customize-a-status-page)
* [**Set Up Status Page SSO**](https://help.isdown.app/status-page/set-up-status-page-sso)
* [**Enable Subscribers**](https://help.isdown.app/status-page/enable-subscribers)


# How to Customize a Status Page

Customize your IsDown status page to reflect your brand identity and provide clear, real-time updates to your stakeholders.

1. To customize the details of a status page, navigate to the **Status Page** tab within the desired profile.<br>

   <figure><img src="/files/XfmlRxMMIL9BXa3meuMn" alt=""><figcaption></figcaption></figure>
2. Navigate to the **Status Page** section and click on **Customize Options**, where you can adjust the following settings:
   * **Logo:** Upload your company's logo.
   * **Name:** Enter the name you want displayed on the status page.
   * **URL:** Set a custom URL for your status page.
3. Further personalize your status page by adjusting these settings:
   * **Theme:** Choose between light or dark mode.
   * **Show Past Incidents:** Display historical incident data.
   * **Show Maintenance Feed:** Include scheduled maintenance information.
   * **Password Protection:** Restrict access to your status page with a password

<figure><img src="/files/LKO7tohZqNxYSwYspPtb" alt=""><figcaption></figcaption></figure>

4. Once you have finished customizing your status page, click the **"Save"** button to complete the process.

If you have any questions or need help, please contact us via in-app chat or email us at **<support@isdown.app>**.

***

**Related Articles**

* [**How to Set a Friendly Name for the Status Page**](https://help.isdown.app/status-page/how-to-set-a-friendly-name-for-the-status-page)
* [**Add Custom Domain**](https://help.isdown.app/status-page/add-custom-domain)
* [**How to Remove IsDown Branding from the Status Page**](https://help.isdown.app/status-page/how-to-remove-isdown-branding-from-the-status-page)


# How to Remove IsDown Branding from Your Status Page

Customize your status page to reflect your brand by removing the default IsDown branding.

{% hint style="info" %}
**This feature is only available starting from the Premium plan**
{% endhint %}

1. Sign in to your **IsDown account**
2. Click on the **Status Page tab** in the top navigation bar.
3. Access the **Status Page settings** by clicking on the gear icon or the **Customize Options** button.

   * **Locate the "Remove IsDown Branding" option:**
     * Check this box to remove the IsDown logo and footer from your status page.

   <figure><img src="/files/3sYDQvaJ9t2JPPTFt8iV" alt=""><figcaption></figcaption></figure>
4. Save it and refresh your status page!

If you have any questions or need help, please contact us via in-app chat or email us at **<support@isdown.app>**.

***

**Related Articles**

* [**How to Customize a Status Page**](https://help.isdown.app/status-page/how-to-customize-a-status-page)
* [**How to Add Custom Domain**](https://help.isdown.app/status-page/add-custom-domain)
* [**How to Set Up Status Page SSO**](https://help.isdown.app/status-page/set-up-status-page-sso)


# How to Configure a Private Status Page

IsDown offers multiple methods to restrict access to your status page, ensuring that only authorized individuals can view sensitive service information.

There are three distinct methods available to ensure the privacy of your status page:

1. **Semi-Private Status Page:** If you enable a status page without setting a short URL, IsDown will assign an UUID (Universally Unique Identifier). While this doesn't make the page fully private, it adds a basic layer of privacy by hiding the page behind an unlisted URL.
2. **Password-Protected Status Page:** You can also choose to protect your status page with a password. This option is available near the bottom of the status page settings. Once enabled, only people with the password will be able to view the page, adding an extra layer of privacy and control.
3. **IP Protected:** Another option is only to allow specific IPs to access the status page. You can define a specific IP or a range of IPs.
4. **Status Page SSO.** Set up SSO to protect your status page.&#x20;

<figure><img src="/files/hK6QIUzgb5ogqaKU48pX" alt=""><figcaption></figcaption></figure>

If you have any questions or need help, please contact us via in-app chat or email us at **<support@isdown.app>**.

***

**Related Articles**

* [**Set Up Status Page SSO**](https://help.isdown.app/status-page/set-up-status-page-sso)
* [**How to Customize a Status Page**](https://help.isdown.app/status-page/how-to-customize-a-status-page)
* [**Add Custom Domain**](https://help.isdown.app/status-page/add-custom-domain)


# How to Set a Friendly Name for Your Status Page

A friendly name is an easy-to-read URL identifier that helps share the status page with clients and teams.

1. Log in to your **IsDown account.**
2. Access the **Status Page** settings.
3. In the **Status Page** settings, find the **Short URL** section. Enter a friendly name of your choice (minimum 4 characters, including letters, numbers, underscores, or dashes). This name will be used to create a more readable URL for your status page.\
   For example: `company-name`, `service14`, `product-status` .

<figure><img src="/files/59Z0SNEFVoYj0DQcNJJS" alt=""><figcaption></figcaption></figure>

4. After entering the name, remember to click the **Save Changes** button.
5. **Your status page URL** will now reflect the friendly name you've set, making it easier to share and remember.

If you have any questions or need help, please contact us via in-app chat or email us at **<support@isdown.app>**.

***

**Related Articles**

* [**How to Customize a Status Page**](https://help.isdown.app/status-page/how-to-customize-a-status-page)
* [**Add Custom Domain**](https://help.isdown.app/status-page/add-custom-domain)
* [**Set Up Status Page SSO**](https://help.isdown.app/status-page/set-up-status-page-sso)


# How to Add a Custom Domain to Your Status Page

This page describes how you can add your custom domain to your status page. Turn https\://isdown.app/s/acme -> https\://status.acme.com

1. **Log in to your IsDown account.**
2. Click on the **Status Page tab** in the top navigation bar.
3. Access the **URL & Custom Domain** field.

<figure><img src="/files/bBjAuLqK95zYB9ipmrkM" alt=""><figcaption></figcaption></figure>

4. Add your desired domain and click **Save.**
5. After saving, on the same page and section, it will show new information. You will need to create a CNAME record pointing your domain to the value we show.

> Tip: A CNAME record links one domain name to another. By creating it, you’re telling DNS to serve your ISDOWN status page when someone visits your custom domain.

<figure><img src="/files/V1JgoQM6BaeugnZcTVMb" alt=""><figcaption></figcaption></figure>

6. After you add it, it will take a few minutes to finish the setup, and your page be available in the new domain.&#x20;

<figure><img src="/files/5RSlzLpWlpYCQirI3fan" alt=""><figcaption></figcaption></figure>

If you have any questions or need help, please get in touch with us via in-app chat or email us at **<support@isdown.app>**.

***

**Related Articles**

* [**How to Customize a Status Page**](https://help.isdown.app/status-page/how-to-customize-a-status-page)
* [**How to Set a Friendly Name for the Status Page**](https://help.isdown.app/status-page/how-to-set-a-friendly-name-for-the-status-page)
* [**Set Up Status Page SSO**](https://help.isdown.app/status-page/set-up-status-page-sso)


# How to Enable Dark Mode on Page Load

IsDown allows you to display your status page in Dark Mode by default, providing a sleek and modern appearance that can align with your brand's aesthetic.

1. Access your **status page URL.**
2. **Append the `?dark=1` parameter** to the end of your status page URL to force Dark Mode on load.
   * **Example:**
     * Original URL: `https://isdown.app/s/yourpage`
     * Dark Mode URL: `https://isdown.app/s/yourpage?dark=1`

```
https://isdown.app/s/xxxxx -> https://isdown.app/s/xxxxx?dark=1
```

4. **Share the updated URL** with your team or stakeholders to provide them with the Dark Mode version of your status page.

{% hint style="info" %}
**Note:** Adding `?dark=1` to your status page URL only affects that specific link.&#x20;

It cannot be set permanently through your status page settings; each link must include the parameter to force dark mode.
{% endhint %}

If you have any questions or need help, please contact us via in-app chat or email us at **<support@isdown.app>**.

***

**Related Articles**

* [**How to Customize a Status Page**](https://help.isdown.app/status-page/how-to-customize-a-status-page)
* [**Add Custom Domain**](https://help.isdown.app/status-page/add-custom-domain)
* [**Set Up Status Page SSO**](https://help.isdown.app/status-page/set-up-status-page-sso)


# How to Set Up Single Sign-On (SSO) for Your Status Page

Enable Single Sign-On (SSO) on your status page to provide secure and streamlined access for your team members using your organization's identity provider.

This article will teach you how to set up SSO for your status page.

1. Go to your **Status Page** settings in the sidebar.
2. Choose the **Privacy & Security** tab.
3. Click **Set Up SSO** button.

<figure><img src="/files/LV1fzsYOsR93a2PkFk33" alt=""><figcaption></figcaption></figure>

4. Get the fields to set up your **SSO app in your provider**, and then in 5, you must return to this form.

* **Identity Provider**: Copy and Paste the SSO URL to your SSO App in Okta or another provider.
* **Issuer**: Copy and Paste "isdown" into Audience URI (SP Entity ID)&#x20;
* **Name ID format:** Email Address;

<figure><img src="/files/D8jV9cdQM6olgi1XRylH" alt=""><figcaption></figcaption></figure>

5. With the metadata generated after creating your SSO:

* **IDP Certificate ->** Copy and paste all the text (SECRET) between BEGIN CERTIFICATE and END CERTIFICATE in the textarea, or if you open the metadata.xml generated, grab the value in the attribute **X509Certificate.**
* **IDP Sign In URL** -> In the metadata.xml file, in the attribute SingleSignOnService, grab the value (URL) for the **Location** attribute.

6. Click **Save.**

If you have any questions or need help, please contact us via in-app chat or email us at <support@isdown.app>.

***

**Related Articles**

* [**How to Customize a Status Page**](https://help.isdown.app/status-page/how-to-customize-a-status-page)
* [**Add Custom Domain**](https://help.isdown.app/status-page/add-custom-domain)
* [**Enable Subscribers**](https://help.isdown.app/status-page/enable-subscribers)


# How to Enable Subscribers on Your Status Page

Enable subscribers on your status page to keep your users informed with real-time updates about service statuses and incidents.

Follow these simple steps to enable subscriber notifications on your Status Page:

1. **Log in** to your **IsDown account.**
2. Click on the **Status Page tab** in the top navigation bar.
3. Select the **Subscribers tab** from the left menu.
4. **Enable the subscriber option:**
   * Check the box labeled **Enable Subscribers.**
5. Click **Save** **Changes** to complete.

<figure><img src="/files/wSBsZsixvIPOAYnggjIg" alt=""><figcaption></figcaption></figure>

That's it! Subscribers are now enabled for your Status Page, allowing users to receive updates directly from you.

If you have any questions or need help, please contact us via in-app chat or email us at <support@isdown.app>.

***

**Related Articles**

* [**How to Customize a Status Page**](https://help.isdown.app/status-page/how-to-customize-a-status-page)
* [**Add Custom Domain**](https://help.isdown.app/status-page/add-custom-domain)
* [**Set Up Status Page SSO**](https://help.isdown.app/status-page/set-up-status-page-sso)


# How to override a theme in a Status Page

Sometimes you have a status page with a specific theme prepared for your customers and team, but then you also want to put it on a TV.

You can override the theme you set up in your status page by passing a theme param in the URL.&#x20;

```
https://status.company.com/?theme=OVERRIDE_THEME
```

Here are the options you have for the theme:

* `isdown`
* `modern`
* `modern-v2`
* `side-by-side`
* `tv-mode`
* `status-page-classic`

You need to change the value of OVERRIDE\_THEME to one of these values.

For example `https://status.company.com/?theme=tv-mode` . Now, people who visit the status page through this URL will see the status page with the theme `tv-mode` , while the others will see it with the default theme.


# Best Practices

Status pages are communication tools, not uptime dashboards.

#### Define the audience first

Before creating a status page, decide:

* Is it public?
* Is it internal?
* Is it for partners?

Audience defines content and tone.

#### Public vs Private status pages

Public status pages should:

* Include only customer facing services
* Be updated during incidents
* Build trust through transparency

Private status pages can:

* Include technical detail
* Track internal incidents
* Be protected by password, IP or SSO

Do not mix internal and customer facing information.

#### One board, one status page

Each board maps to one status page.

If you need different audiences, you likely need different boards.


# How to add a new Board

Boards let you organize your monitoring by team, client, or project. Each board has its own dashboard, alerts, and status page. Use them to keep everything separate and easy to manage.

1. **Go to Account Settings → Manage Boards**\
   To add a new Board, click on your company name in the sidebar, then select **Account Settings** on your current Dashboard.

<figure><img src="/files/uDTTdGSEUvPZWsTyaj8M" alt=""><figcaption></figcaption></figure>

2. Select **Manage Boards**

<figure><img src="/files/P3Rk0350iHMvBohzk9DC" alt=""><figcaption></figcaption></figure>

3. **Create a New Board**\
   In the "Create New Board" section, enter a name that reflects the team or use case (example: `Engineering`, `Client "X"`, or `Marketing`).
4. **Click Add Board**\
   Your new board will appear in the list below - **List of Boards,** with its own configuration space.

<figure><img src="/files/8BQhLio3guYV9wiVMhVT" alt=""><figcaption></figcaption></figure>

### After Creating a Board

You’ll now be able to:

* Add monitors (3rd-party, website, or custom)
* Enable or disable a public status page
* Set up alerts and integrations
* Invite members to this specific board

{% hint style="info" %}
Boards are **independent**, so alerts and services do not overlap unless manually added to each.

Use meaningful names to keep your workspace organized.
{% endhint %}

If you have any questions or need help, feel free to reach out via chat or email us at **<support@isdown.app>** — we’re here to help.

***

**Related Articles**

* [**How to Edit a Board Name**](https://help.isdown.app/profiles/how-to-change-the-name-of-a-profile)
* [**How to Add Team Members**](https://help.isdown.app/accounts/how-to-add-a-team-member)
* [**How to Delete a Board**](https://help.isdown.app/profiles/how-to-delete-a-profile)


# How to Edit a Board Name

1. **Go to Account Settings → Manage Boards**\
   Click your company name in the sidebar, then select **Manage Boards** under **Account Settings.**
2. **Find the Board You Want to Rename**\
   Locate the board in your list and click the **pencil icon** next to its name.
3. **Edit and Save**\
   Type the new name for the board in the input field and click **Save Changes**.

<figure><img src="/files/o28TsW24QakuXHwa8Y3W" alt=""><figcaption></figcaption></figure>

Have questions? Reach out via chat or email us at **<support@isdown.app>** — we're happy to assist!

***

**Related Articles**

* [**How to Add a New Board**](https://help.isdown.app/profiles/how-to-add-a-new-profile)
* [**How to Delete a Board**](https://help.isdown.app/profiles/how-to-delete-a-profile)
* [**How to Update a Board’s Time Zone**](https://help.isdown.app/profiles/how-to-update-your-profiles-time-zone)


# How to Delete a Board

Deleting a board permanently removes all associated monitors, status pages, and configurations. Only do this if you're sure the board is no longer needed.

{% hint style="warning" %} <mark style="color:red;">Warning! When you delete your profile, everything associated with it will be destroyed. Monitors, notifications, and integrations that were set up will be destroyed.</mark>&#x20;
{% endhint %}

1. **Open Account Settings → Manage Boards**\
   Click on your company name in the sidebar and select **Manage Boards**.
2. **Locate the Board**\
   Find the board you want to delete in the list.
3. **Click the Trash Icon**\
   Next to the board name, click on the **Trash icon**.
4. **Confirm Deletion**\
   A confirmation pop-up will appear. Click **Delete** to confirm.

<figure><img src="/files/nSaS1pzba4m1muE5Kk2E" alt=""><figcaption></figcaption></figure>

If you have any questions or need assistance, reach out via chat or email us at **<support@isdown.app>** — we’re here to help.

***

**Related Articles**

* [**How to Add a New Board**](https://help.isdown.app/profiles/how-to-add-a-new-profile)
* [**How to Update a Board's Time Zone**](https://help.isdown.app/profiles/how-to-update-your-profiles-time-zone)
* [**How to change the name of a Board**](https://help.isdown.app/profiles/how-to-change-the-name-of-a-profile)


# How to Update Your Board’s Time Zone

Each board in IsDown can have its own time zone setting. This ensures that incident timestamps and notifications are shown in your local time.

**Steps to Update a Board’s Time Zone**

1. **Go to Account Settings → Manage Boards**\
   In the left sidebar, click on your company name, then select **User Settings**

<figure><img src="/files/6MD7RCSf7dd4WS7Ytk3k" alt=""><figcaption></figcaption></figure>

2. **Change the Time Zone**\
   In the settings panel, choose the correct time zone from the dropdown menu.
3. **Click Save**\
   Confirm your changes by clicking **Save**. All incident times for this board will now display in the selected time zone.

{% hint style="info" %}
**Why This Matters**

Setting the right time zone ensures that all timestamps on incidents, updates, and notifications match your team’s working hours — avoiding confusion and improving response coordination.
{% endhint %}

Have any questions? Feel free to reach out via live chat or email us at **<support@isdown.app>** — we're always happy to assist.

***

**Related Articles**

* [**How to Add a New Board**](https://help.isdown.app/profiles/how-to-add-a-new-profile)
* [**How to Change a name of a Board**](https://help.isdown.app/profiles/how-to-change-the-name-of-a-profile)
* [**How to Delete a Board**](https://help.isdown.app/profiles/how-to-delete-a-profile)


# How to monitor your Microsoft 365 instance

{% hint style="info" %}
This feature is only available starting with the Business plan.
{% endhint %}

1. Go to [Azure Portal - App registrations](https://portal.azure.com/#view/Microsoft_AAD_RegisteredApps/ApplicationsListBlade)

   <figure><img src="/files/HHoo9IzWyUwsiRoHJMNO" alt=""><figcaption></figcaption></figure>
2. Create a new registration
3. Go to the API permissions menu

   <figure><img src="/files/nIDh1bYycwQP8dF6kD3x" alt=""><figcaption></figcaption></figure>
4. Remove all default permissions
5. Add new permission: Microsoft Graph -> Application permissions -> Add Permission "ServiceHealth.Read.All"
6. Grant Admin Consent for \[organization]

   <figure><img src="/files/Mwh9HJVaJLtj3XYZSXwP" alt=""><figcaption></figcaption></figure>
7. Go back to the Overview page
8. Click on "Add certificate or secret" -> New Client Secret -> Enter a description -> Choose an expiration (it should be as long as you will need it)

   <figure><img src="/files/uGp5w5GE6aow1MMIWaqH" alt=""><figcaption></figcaption></figure>
9. Save the secret and copy the value.
10. Return to IsDown and go to the "Alerts & Integrations" screen. Choose "Microsoft 365" integration.
11. Enter your Tenant ID, Client ID, and Client Secret above. Click Save.

    <figure><img src="/files/DVy0XNlp0oUf2zKquwv8" alt=""><figcaption></figcaption></figure>
12. Congratulations! You're all set. We've created a Private 3rd-Party Service that monitors your Microsoft 365 instance.


# How to monitor your Zendesk instance

With IsDown you're able to monitor your own Zendesk instance instead of the generic status page

{% hint style="info" %}
This feature is only available starting with the Business plan.
{% endhint %}

1. Go to the Alerts & Integrations&#x20;

2. Select the Zendesk Private card

3. Enable the integration and add your subdomain

   <figure><img src="/files/BP8vndSqEGYLoknr2CLi" alt=""><figcaption><p>Zendesk Status Page</p></figcaption></figure>

   <figure><img src="/files/Xqp1qt4XxEtmZLyx8arc" alt=""><figcaption></figcaption></figure>

4. Click Save, and we will create a new private third-party monitor in the current board.

5. Once it's completed, you will start receiving alerts & notifications of outages that only affect your Zendesk instance.


# Which IsDown Plan Should I Choose?

Choosing the right plan depends on how many services you want to monitor, how many team members need access, and which notifications or integrations you require.

#### **Quick Overview:**

* **Starter**&#x20;
  * For individuals or small startups starting with status monitoring.
  * Limits: 15 monitors, 1 board, 1 status page, 1 admin user.
* **Pro**
  * For growing SaaS teams that need reliable monitoring across multiple products.&#x20;
  * Limits: 30 monitors, 2 boards, 2 status pages, 2 admin users.&#x20;
* **Premium**
  * For teams requiring advanced integrations and private status pages.&#x20;
  * Limits: 70 monitors, 5 boards, 5 status pages, 5 admin users.&#x20;
  * Includes Admin SSO.
* **Business**
  * For larger operations with multiple products and stakeholders.&#x20;
  * Unlimited boards and status pages, 15 admin users, 24 months of historical data.&#x20;
  * Includes API access and full SSO ( Admin + Status Pages ).
  * MCP Server
* **Enterprise**
  * For large organizations requiring compliance, custom contracts, and dedicated support.
  * Includes 250+ monitors, 5,000+ subscribers, unlimited admin users, 48 months of historical data.
  * Dedicated account manager.
* **MSPs & Agencies**
  * For agencies managing multiple clients with a centralized view.&#x20;
  * Includes up to 400 monitors, 20 boards, a super admin view.
  * Access to all integrations.


# How to Change Your IsDown Plan

Changing your plan in IsDown is simple and flexible. You can upgrade immediately or schedule a downgrade for the end of your billing cycle.

**Steps to change your plan:**

1. Go to **Billing** in your account settings or on the Analytics menu on the left tab bar.<br>

   <figure><img src="/files/LWbPIwW7XU97sjV0aRDu" alt=""><figcaption></figcaption></figure>
2. Click **Manage Subscription**.

   <figure><img src="/files/7ELEo13tSt28NXgC5aLq" alt=""><figcaption></figcaption></figure>
3. Select **Update subscription** or **Cancel** **subscription.**

   <figure><img src="/files/gjJiN6zCahpwmt3cmvaw" alt=""><figcaption></figcaption></figure>
4. 1. **Update subscription:**&#x20;
      1. Select the plans you want to upgrade/downgrade to.
      2. Click **Continue** and you will be redirected to a payment page.
   2. **Cancel subscription:**
      1. Redirects you to a page to confirm that you want to cancel and gives you the date until when you will have an available subscription.


# Paying for IsDown

This article explains how to pay for your IsDown subscription, including which payment methods are accepted and what options are available if you're on an enterprise plan.

IsDown accepts the following payment methods:

* Credit and debit cards (Visa, MasterCard, American Express)
* Google Pay
* Apple Pay
* Other methods supported by Stripe

All payments are processed securely through [Stripe](https://stripe.com/), our payment infrastructure provider.

{% hint style="info" %}
After each payment, a tax invoice will be automatically issued and sent to your registered email address.
{% endhint %}

If you require paying for IsDown by other means, we can only offer this in our Enterprise tier. Please also see [Custom contracts, documents, and POs. ](https://help.isdown.app/plans-and-payments/custom-contracts-documents-and-pos)

If you have any questions or need assistance with payments, please reach out via in-app chat or email us at <support@isdown.app>.

We are always happy to help you.

***

**Related Articles**

* [**Custom contracts, documents, and POs**](https://help.isdown.app/plans-and-payments/custom-contracts-documents-and-pos)
* [**Get Invoices via Email**](https://help.isdown.app/get-invoices-via-email)


# Custom Contracts and Enterprise Payment Options

If your company needs to use a **Purchase Order (PO), Custom Contract, or specific Documentation for procurement**, IsDown supports that on the **Enterprise plan.**&#x20;

This guide explains what’s available and how to get started, so your team can complete onboarding and payment with the right paperwork in place.

For **Pro, Premium, and Business** plans, the subscription is governed by IsDown’s standard [Terms of Service](https://isdown.app/terms) and [Privacy Policy](https://isdown.app/privacy). These terms are generally sufficient for most organizations and do not require additional documentation.

However, we know that some companies — especially larger ones — need more flexibility. This can include signing a custom contract, submitting specific documents, or using a purchase order.

These requests often require legal review and technical adjustments, and we can only support that level of customization on the **Enterprise** plan.

The Enterprise plan includes:

* Support for **custom contracts**
* **PO-based payments**
* **Higher limits** across the board
* Access to our **full-featured API**
* Options for **custom integrations** with your internal tools

We hope this helps explain why custom contracts are only available on the Enterprise plan.\
If you have any questions or need help, feel free to reach out at **<support@isdown.app>.**

We are always happy to help you.

***

**Related Articles**

* [**Paying for IsDown**](https://help.isdown.app/plans-and-payments/paying-for-isdown)
* [**Get Invoices via Email**](https://help.isdown.app/get-invoices-via-email)


# Get Invoices via Email

Automatically send invoices to your finance team, expense management tools, or specific billing contacts.

You can now **choose which email addresses should automatically receive your invoices** — no more forwarding or manual handling required!

Perfect for:

* Finance departments
* Expense management tools
* Multiple stakeholders who need invoice access

Here’s how to do it:

* Go to the [Billing Page](https://isdown.app/settings#billing).
* In the **Invoice Email Addresses** field, enter the email addresses.
* Use a **comma-separated format,** for instance:

<finance@yourcompany.com>, <ops@yourcompany.com>, <ceo@yourcompany.com>

<figure><img src="/files/k6PndgkzpKzFUOg7RR8h" alt=""><figcaption></figcaption></figure>

Invoices will be automatically sent to all specified emails.


# Referral Program

Welcome to our referral program!

We created this program to make it easier for IsDown users to recommend IsDown to other people and companies that might benefit from it.

We also want to make it worthwhile, so for every user who subscribes to IsDown via your link, we'll gift you a $50 Amazon Gift Card.&#x20;

We will send you the Gift Card code when the referrer spends $ 50 or more on their subscription. \
\
What do you need to do?

* Sign in, click Account Settings in the sidebar, and get your unique referral link.<br>

  <figure><img src="/files/yTIzsIC4YSocjL69xZtL" alt=""><figcaption></figcaption></figure>
* Share it with your network ( Twitter/X, LinkedIn, Email, WhatsApp, Newsletter, etc. )
* After new users subscribe to a plan with your referral link, and spend more than $50, we will send you the gift card code.

Terms and Conditions:

* You can't create ads to compete for our brand name (IsDown)
* This only applies to new subscriptions. A new customer is a company that has never subscribed to IsDown.
* The code will be sent up to 15 days after the conditions are met.